How to Create a Program for Controlling the Axis Group
The following instructions describe how to create a program for controlling an axis group.
Requirement: A project has been created with an axis group, as specified in the How to Create an Axis Group chapter.
The program for controlling an axis group is created in the PLC_PRG POU with CFC as the implementation language.
Open the
PLC_PRGprogram in the editor.Drag the Box element to the editor.
Map the function block
SMC_GroupPowerto the box.Configure the function block according to the following image.
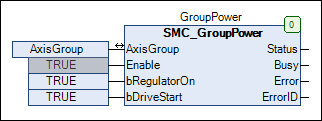
Explanation:
The function block activates all drives of the axis group.
The output
Statusindicates successful controller enable.
Create a function block of type
MC_GroupEnable.This function block transfers control of the linked axes to the AxisGroup axis group.
Connect the
Statusoutput of theSMC_GroupPowerfunction block to theExecuteinput of theMC_GroupEnablefunction block.
Explanation:
When all axis controllers are powered (
Status = TRUE), control of the axes is transferred to the axis group.The
Doneoutput reports the success of the command.
Insert a
MC_MoveDirectAbsolutefunction block for running the drive.Connect the
Doneoutput of theMC_GroupEnablefunction block to theExecuteinput of theMC_MoveDirectAbsolutefunction block.Extend the program as follows:
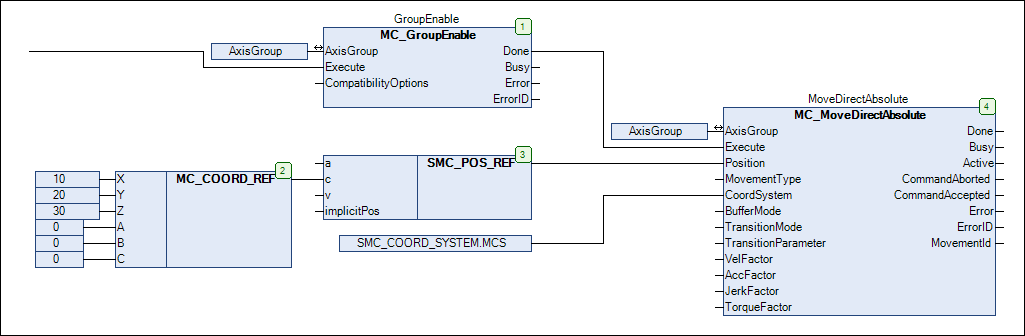
Explanation:
The
MC_MoveDirectAbsolutefunction block commands a PTP motion of the AxisGroup axis group.In the example, the kinematics are moved to the position (X = 10, Y= 20, Z = 30). This value is mapped to the
Positioninput via theSMC_POS_REFstructure.The position is specified in the machine coordinate system (MCS). The coordinate system is selected by means of the
CoordSysteminput.
Starting the program
If the program has been created completely and it can be compiled without errors, then you can transfer it to the controller.
Start the CODESYS Control Win runtime system (
CODESYSControlService.exeprogram in the"...\GatewayPLC"directory).In the Communication Settings, set the connection path to your controller.
Click Online → Login.
Download the project to the controller.
Click .
In the editor, open the AxisGroup object.
The positions of the axes are displayed.
Click Debug → Start.
The positions of the axes change.