How to define switch points
Use switch points to trigger events depending on the master position. For example, this can be the setting of an output or the calling of a function block.
These instructions use the example from the How to create a cam chapter to demonstrate how to define switch points. In this example, the tappet starts and stops the welding process.
Open the Vertical axis cam in the editor.
The Cam tab is visible.
Select the Tab: Tappets.
In the Toolbox view, select the Add tappet tool.
The mouse pointer turns into cross hairs when you move it into the editor.
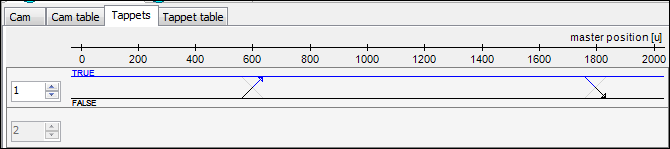
Click below the master position near position 600.
A tappet is inserted to the tappet path 1.
Select the tappet.
Change the values of the tappet in the "Properties" view.
X: 600
Positiver pass: Switch ON
Negative pass: No action
Insert another tappet to tappet path 1 at X: 1800.
X: 1800
Positiver pass: Switch OFF
Negative pass: No action
Check the result.
Tip
You can also change the values for Positive pass and Negative pass by clicking the respective end of the  crosshairs.
Tip
Note that you can also set the switch points on the Tappet table tab. This editor provides you with the same options, but in tabular form.