Ethernet/Fieldbus Performance
The following section describes how to optimize an existing Linux system which runs a CODESYS Runtime system while using Ethernet-based fieldbuses. These fieldbuses include, for example, EtherCAT, PROFINET, or EtherNet/IP.
The description here is given as an example for the EtherCAT Master and can also be used in the same way for PROFINET.
Requirements
Hardware
Desktop PC
Linux PC:
At least one free Ethernet port per real-time sensitive fieldbus – for example EtherCAT Master / PROFINET – for exclusive use.
Important
The used port should not be connected by a switch or USB (not even internally).
Software
CODESYS IDE
IEC application with an EtherCAT Master
Linux operating system – for example Debian – with a real-time kernel
For more information, see the following: Performance Optimization
CODESYS Runtime system – for example CODESYS Control for Linux SL
Configuration
The goal is essentially to make sure that all threads, which are involved in the operation of the CODESYS Runtime system as EtherCAT Masters, run on a predefined CPU with a defined priority. To do this, settings are possible both in the IEC application as well as on the Linux system.
Important
Do not use CPU 0 for this because it is typically used by the operating system for certain system services (housekeeping).
For optimization on the Linux system, it is recommended to use PLCShell commands. The required settings can also be configured via the runtime configuration or directly on the Linux system. For more information, see the following: Performance Optimization
Establish a connection with CODESYS to the runtime system and open the PLCShell.
Set
scaling_governortoperformance.rt-set scaling_governor all performance
Set the CPU frequency. You need to configure these settings directly on the Linux system. For more information, see the following: Setting the CPU frequency on a Linux system.
In runtime version SP23 and higher, there will be PLCShell commands for setting the CPU frequency.
First determine the possible frequencies:
rt-get cpu_frequency
Example of an output

Set the frequency (min and max) to a fixed value:
rt-set cpu_frequency all 3000000
Disable hyperthreading:
rt-set hyperthreading off
Disable throttling:
rt-set throttling off
Enable NAPI threads for the used network adapter (here:
ens5):rt-set napi ens5 on
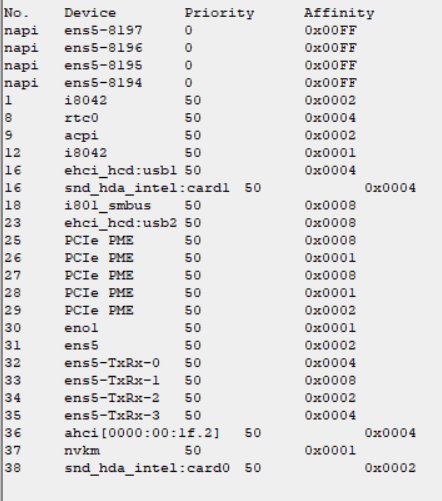
Determine the IRQ and NAPI threads of the network adapter:
irq-list
Example of an output
Use
irq-set-prioandirq-set-affinityto increase the priority for network adapters – for example, on 55 – and bind the network adapters to the same CPU – for example,0x2for CPU 1.Important
Set the preferences by name, not by number. Numbers can change when the system starts.
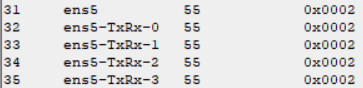
Set the respective NAPI threads to the same priority and CPU:

Set the priority of the
EtherCAT_Taskto 1. This corresponds to the Linux real-time priority 55.For more information, see the following: Mapping of Task Priorities on a Linux System
Use a task group to bind the
EtherCAT_Taskto the same CPU (here: Core 1, corresponds to affinity0x2):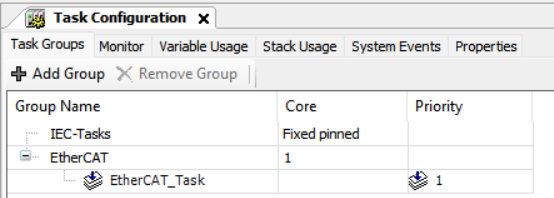
Case example: EtherCAT, PROFINET, EtherNet/IP
Scenario: 3 Ethernet-based fieldbuses (example EtherCAT, PROFINET, EtherNet/IP) on a Linux system with at least 4 CPUs
The following settings are recommended (CPU 0 is avoided):
Fieldbus | IEC Task Name | IEC Task Priority | IEC Task Core | IRQ Priority | IRQ Affinity |
|---|---|---|---|---|---|
EtherCAT |
| 1 | 1 | 55 | 0x2 (CPU 1) |
PROFINET |
| 1 | 2 | 55 | 0x4 (CPU 2) |
EtherNet/IP |
| 1 | 3 | 55 | 0x8 (CPU 3) |
Setting the CPU frequency on a Linux system
Important
The following settings are lost when a Linux system starts and therefore must be reset after a restart.
You can use the following Linux console commands to determine the minimum and maximum CPU frequencies (here: CPU0-3):
cat /sys/devices/system/cpu/cpu0/cpufreq/cpuinfo_max_freq
cat /sys/devices/system/cpu/cpu1/cpufreq/cpuinfo_max_freq
cat /sys/devices/system/cpu/cpu2/cpufreq/cpuinfo_max_freq
cat /sys/devices/system/cpu/cpu3/cpufreq/cpuinfo_max_freq
cat /sys/devices/system/cpu/cpu0/cpufreq/cpuinfo_min_freq
cat /sys/devices/system/cpu/cpu1/cpufreq/cpuinfo_min_freq
cat /sys/devices/system/cpu/cpu2/cpufreq/cpuinfo_min_freq
cat /sys/devices/system/cpu/cpu3/cpufreq/cpuinfo_min_freq
Example of an output
3800000
3800000
3800000
3800000
1600000
1600000
1600000
1600000
You can use the following commands to set the CPU frequencies:
echo "3000000" | sudo tee /sys/devices/system/cpu/cpu0/cpufreq/scaling_max_freq
echo "3000000" | sudo tee /sys/devices/system/cpu/cpu1/cpufreq/scaling_max_freq
echo "3000000" | sudo tee /sys/devices/system/cpu/cpu2/cpufreq/scaling_max_freq
echo "3000000" | sudo tee /sys/devices/system/cpu/cpu3/cpufreq/scaling_max_freq
echo "3000000" | sudo tee /sys/devices/system/cpu/cpu0/cpufreq/scaling_min_freq
echo "3000000" | sudo tee /sys/devices/system/cpu/cpu1/cpufreq/scaling_min_freq
echo "3000000" | sudo tee /sys/devices/system/cpu/cpu2/cpufreq/scaling_min_freq
echo "3000000" | sudo tee /sys/devices/system/cpu/cpu3/cpufreq/scaling_min_freq