Edge Gateway for Windows
Connecting an Edge Gateway to the server and entering PLCs
You have purchased the CODESYS Automation Server in the CODESYS Store International and created a user account with user name and password for accessing the server. For detailed instructions, see Getting Started with the CODESYS Automation Server.
The CODESYS Automation Server Connector package is installed on your computer in the CODESYS Development System and CODESYS has been restarted.
Alternatively for this, you can use the CODESYS Service Tool for the configuration of the Edge Gateway. A CODESYS installation is not required to use the service tool. You find the CODESYS Service Tool in the installation directory and CODESYS Store International. The CODESYS Service Tool is called by means of the file
CODESYS.ServiceTool-win-x86.exein Windows.If your gateway does not include the extension of the Edge Gateway: You have downloaded the CODESYS Edge Gateway from the CODESYS Store International and installed it on your computer or on a standalone target.
This gateway is running.
To provide a secure environment for the Edge Gateway, configure the settings in the configuration file
Gateway.cfgas described in the configuration.In CODESYS in the notification area of the system tray, click the gateway symbol
 , and in the menu click Allow Edge Gateway Configuration.
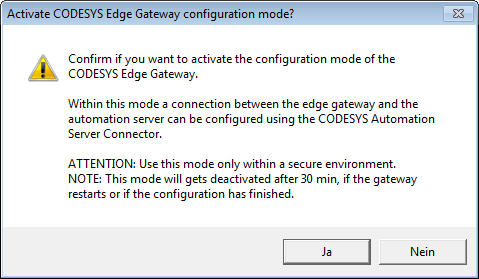
Read the notes in the Activate CODESYS Edge Gateway Configuration Mode dialog and then click OK.
Dialog: Activate CODESYS Edge Gateway Configuration Mode

In CODESYS, click .
The Connect or Reconfigure Edge Gateways view opens.
In the Edge Gateway group, in the Gateway hostname / IP field, click the list box arrow and select the gateway that should be configured as the Edge Gateway. The list box contains that gateways that are already configured in CODESYS.
The Gateway port field is updated automatically.
As an alternative to the previous step, you could also manually specify Gateway hostname / IP and Gateway port.
If you have manually specified the data, then you need to click the Check / Refresh Gateway Information button for the initial display of the Edge Gateway data (for example, whether or not the configuration data is set). As an alternative, you could also press the Enter key in one of the two fields.
If the Configuration mode is displayed as disabled in the Edge Gateway group of this view, then click the Check / Refresh Gateway Information button. If the configuration mode is still not enabled, then recheck Steps 1 to 3 of this guide.
Now enter the following information for CODESYS Automation Server in this view:
Server URL: URL of the CODESYS Automation Server
Name on server: Name that the Edge Gateway will have on the CODESYS Automation Server
Description: Description of the Edge Gateway
Click the Connect to Server button.
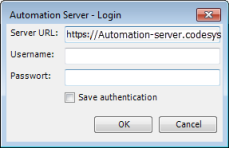
The following dialog opens for signing in to the CODESYS Automation Server:

You have specified the Server URL in the Connect or Reconfigure Edge Gateways view. You can no longer change it in this step.
When MFA is activated for the given user, or not yet activated but enforced, then the browser view of the CODESYS Automation Server also opens to enter the token or to activate MFA. After you have completed this successfully, you are redirected back to CODESYS.
If the communication with the CODESYS Automation Server is running via a proxy server, then the Proxy Server – Sign In dialog opens first before the Automation Server – Sign In dialog. In this dialog, you specify the Proxy URL, User name, and Password for the proxy server and then click OK.
In this dialog, enter your user name and password for the CODESYS Automation Server and click OK.
A message is displayed in the message view that a new Edge Gateway has been created on the CODESYS Automation Server.
The Certificate state and Certificate thumbprint fields are updated in the Connect or Reconfigure Edge Gateways view. The certificate state of the CODESYS Automation Server area reads Primary Certificate matched. The Certificate thumbprint for the Edge Gateway and the CODESYS Automation Server is identical. The Certificate thumbprint is visible when the Show details option is selected.
Important
If the certificate status shows that the certificate is not valid, then the Edge Gateway cannot be connected to the CODESYS Automation Server.
Click the Show Edge Gateway on Server command.
The sign-in dialog of the CODESYS Automation Server opens.
In the Sign In dialog, use your user name and password to sign in to the .
When MFA is activated for the given user, or not yet activated but enforced, then the browser view of the CODESYS Automation Server also opens to enter the token or to activate MFA. After you have completed this successfully, you are redirected back to CODESYS.
The view opens.
The recently created gateway is shown and is identified by a solid green circle (which means that it is currently running).
In the next steps, you specify a PLC on the CODESYS Automation Server for the new gateway.
To establish the connection from the CODESYS Automation Server to your PLC, first make sure that the PLC is running. In the menu of the CODESYS Automation Server, click .
In the Network Scan view, select your recently created gateway and click the refresh
 button.
Note: Make sure that the names of the PLCs below a gateway are unique.
All available PLCs in the network are displayed.
Select your PLC from this list.
The Last seen on, Serial number, and Device identification information is displayed for this PLC.
Click Add to Server.
The Add PLC to Automation Server dialog opens.
If a user management is enabled for a PLC in CODESYS, then in the Add PLC to Automation Server dialog you first have to enter the User name and Password for the PLC.
In order for the CODESYS Automation Server to successfully connect to a PLC, the credentials of a PLC user with administrator permissions have to be entered here.
If no user management is enabled for the PLC, then a dialog prompt opens for you to set up a user management on the PLC. To do this, specify the User name, Password, and Repeat password fields. Finally, click Confirm.
The user management with the user which have just configured is set up on the PLC.
The List View window opens and also shows the recently added PLC. This PLC is identified by a solid green circle
 (which means that the CODESYS Automation Server is connected to the PLC). By contrast, PLCs that are not currently connected to CODESYS Automation Server, or which are in an error state, are identified by a solid red circle
  .
.To add a tag to your PLC, click the Details button. Then click New tag in the PLC Details view and provide a name for the tag (example:
Group1).In the List View, you can filter the displayed PLCs by tags. Click the tag of a PLC to do this.
Moreover, you can group the PLCs by tags in the topology view.