Command: Wildcard Selection
This command (category "Composer") opens the dialog Wildcard assignment.
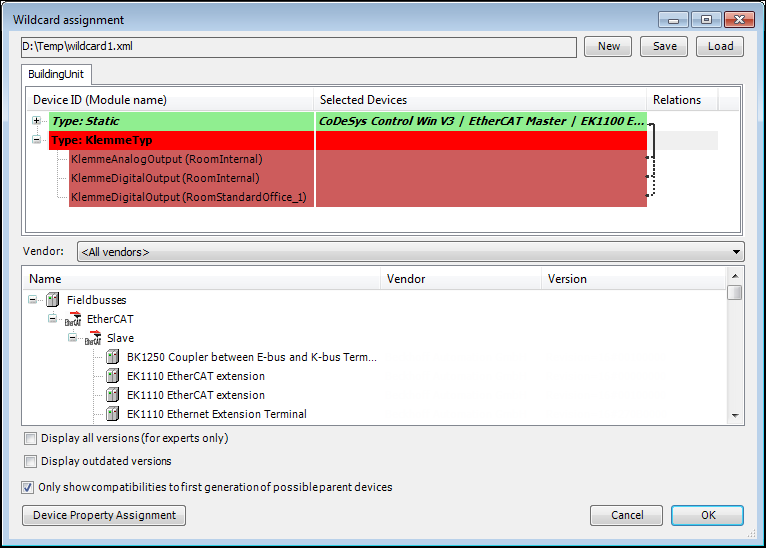
The upper part of the dialog shows the currently configured wildcards and the assigned device types. In the lower part of the dialog the Device Repository is represented, offering installed devices for selection. You can edit the assignments within the dialog. For this purpose the dialog also appears during the device generation, when wildcards cannot get assigned to device types automatically and manual assignment is needed.
The assignment of the wildcards to device types is stored within the project. However you also can use a XML file for saving the assignments externally and reload them from there. File and path of this file are shown at the top of the dialog.
New: This command allows to create a new (empty) wildcard assignment XML file. Define file name and storage directory.
Save: This command saves the currently defined wildcard device assignment explicitly to a manually chosen file. Apart from this, the assignments will be saved automatically in the currently specified file, when closing the dialog using the OK button.
Load: This command allows to load an existing wildcard assignment file (XML).
In the highlighted tree view, the Device ID (Module name) column shows the IDs of the devices of the device generator which use wildcards. The name of the module instance which brings this device is shown in brackets. In case of statically inserted device generator device (defined by the module declaration Identification and not Wildcard/FlexibleWildcard) a standard node Static is created which contains all statically inserted devices. Static devices cannot be modified. The Relations columns shows the relationship between parent and child devices of the device generator. A bold line indicates a fixed relation, where a dashed line serves as a suggestion for a relationship. The suggestion is based on the definition of ParentID in the Device section.
Wildcards can also be marked as empty by simply selecting them and pressing the Del key. For example such an empty wildcard could serve to alter proposed parent-child relationships.
Assigned wildcards are displayed with a green background color; unassigned wildcard with a red background color.
Only show compatibilities to first generation of possible parent devices: If this option is activated, the device assortment of the device repository view is further restricted to those devices, which are compatible children of only the first device parents. This is defined by the module configuration. If not activated, also device parents of 2nd, 3rd, …, nth generation are treated as possible parents, enlarging the shown device assortment of the device repository view.
Assigning wildcards
There are two ways to assign a wildcard:
In the upper part of the dialog, in the line of the wildcard to be assigned, click into the field in column Selected Devices. Then, in the Device Repository tree in the lower part of the dialog, double click on the desired device.
In the Device Repository tree in the lower part of the dialog, select the desired device. Then, in the upper part of the dialog, in the line of the wildcard to be assigned, double click on the field in column Selected Devices.
Device property assignment
The command Device Property Assignment opens the respective dialog, which serves to assign offering properties to devices.

On the left side of the dialog lists all generated devices used in the project. The child nodes of these devices display all inputs, outputs (not bold) and created function blocks (bold) of the according device type.
The right side display lists all "demanding" properties, which are defined in module declarations of the used modules as demanding IOs. The child nodes of these "demandings" correspond to all module IOs which require their parent nodes demanding.
The property assignment dialog is used to assign the properties of the right side to the devices and their IO channels. This assignments will be saved in a extra file next to the devices’ device description, which gets reference to the extra file. The dialog opens automatically during code generation if not all "demanding" properties of the module IOs are satisfied with at least one assignment to a device which offers these properties.
Rules for property assignment
If a device or an IO channel or FB instance is selected on the left side all properties for this device or IO channel or FB instance which are already assigned will be marked with a checked box on the right side
Devices on the left side without assigned properties for its IO channels or FB instances will be displayed with a red background, the concerning IO channel or FB instance will be displayed with a red background, respectively. Devices for which all I/O channels and FB instances are assigned are highlighted in green, as are the known I/O channels and FB instances. Assignment also includes not assigning a "demanding" property. The latter can be achieved for a complete device by double-clicking on a device node for the entire device with all its I/O channels and FB instances.
Properties on the right can be added to the "offering" properties of the device, I/O channel, or FB instance selected on the left by checking the box. Any number of properties or none can be assigned to a device, I/O channel or FB instance.
If a "demanding" I/O property is assigned to a device node, then this property is assigned to all child I/O channel nodes of this device node, but not to the FB instances. Similarly, if a device is assigned a "demanding" InstRef property, then only the child FB instances of that device are assigned that property. Several devices, I/O channels, or FB instances can be selected at the same time, to each of which the selected properties are then assigned, as is possible.
"Demanding" properties on the right side which are at least offered by one device on the left side will be displayed with a green background. "Demanding" properties without matching offering properties on the left side will be displayed with a red background.