Editing Visualization Styles in the Editor
A style is an XML file with the file extension *.visustyle.xml. It contains a specific set of style properties which are automatically checked for consistency.
You can create a new style or customize an existing style. The Visualization Style Editor is provided for this purpose.
If you customize a style, then a new style is created as a hierarchy of styles. A hierarchy consists of at least two styles based on each other. The nesting depth is unrestricted. A hierarchy is identified simply with its top derived style. You can derive multiple different styles from one base style by extending the styles by differing style properties. This saves memory and therefore should be your preferred method.
A base style does not have to be consistent for itself. Instead, you must identify it as a partial style. Only the top derived style must be consistent.
Important
Styles marked as "partial" cannot be used as complete, standalone styles. As a result, they are not displayed in the Visualization Manager.
For more information, see the following: Entries in the Visualization Style
Example of a style hierarchy
PetrostyleIn a partial style, you can combine any style properties to form efficient hierarchies without having to worry about consistency. For example, you can collect all image references into one partial style. Then you derive the style and define more style properties for colors. This style is also partial. You derive the style again and define more style properties for its fonts. The top style is now completely.
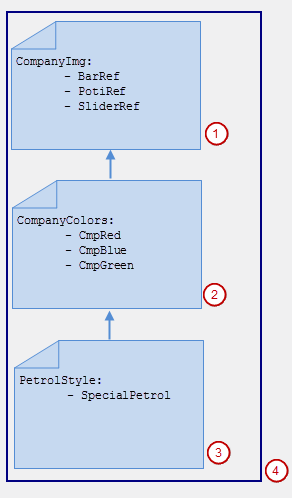
CompanyImgis a partial style defining image references.CompanyColoris a partial, derived style based onCompanyImgand also defines colors.PetrolStyleis a complete, derived style based onCompanyColorand also defines a special color.The hierarchy of styles comprises
PetrolStyle,CompanyColor, andCompanyImg.
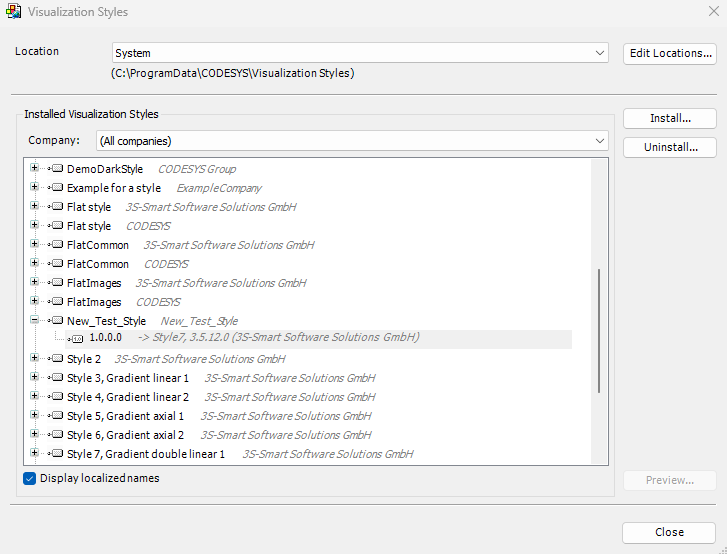
In the Visualization Style Editor, you can open a style, define its style properties, and localize its name. If the style is consistent, then you can install it in the Visualization Style Repository. The editor is not integrated in CODESYS Development System.
Names for style properties
A style property is an entry for a specific color, a specific font, or a specific image reference.
If this name contains a dash, then the Visualization Style Editor can sort the style properties by the prefixed terms before the dash and display them in a hierarchy. Otherwise the names can be sorted in alphabetical order or sequential order or in sequential order (as saved in the XML file).CODESYS displays the style properties in the order of names actually saved in the XML file for the style.
Example: Element-Alarm-Fill-Color
Starting the editor in CODESYS Development System
Double-click the Visualization Manager object.
The editor opens.
On the Settings tab, in the Style Settings group, click the
 symbol.
Click Open Style Editor from the list box.
The Visualization Style Editor opens.
Starting the editor independently of CODESYS
Choose Visualization Style Editor from the CODESYS install folder in the Start menu. If you have a standard installation, then this link is located in the installation folder:
CODESYS.The Visualization Style Editor opens.
Deriving visualization styles
Tip
The is the recommended way to create a style that combines existing style properties with new ones.
Requirement: CODESYS is open with a project containing a visualization.
Double-click the Visualization Manager object in the device tree.
The editor opens.
On the Settings tab, in the Style Settings group, click the
symbol.A list of commands opens.
Click Create and Edit Derived Style.
The Visualization Style Editor opens and the Create New Visualization Style dialog opens.
Specify a name.
Select a directory.
Select a base style. The default style is set in CODESYS. You can also select a style from the repository.
The new style appears in the Visualization Style Editor. The style properties from the base style are displayed yellow.
Add a new style property or modify an existing value.
Provide a version for the style and click .
The style is installed in the repository. The memory requirement is low because only the style property added in Step 7 is saved.
Copying visualization styles
Requirement: CODESYS is open with a project containing a visualization.
Double-click the Visualization Manager object in the device tree.
The editor opens.
On the Settings tab, in the Style Settings group, click the
symbol.A list of commands opens.
Click Copy and Edit Style.
The Visualization Style Editor opens with the Open Existing Style as Copy dialog.
Select which style should be copied (Style).
Type a directory in "Destination" and click OK.
The new style appears in the Visualization Style Editor. All style properties are identical to those in the copied style.
Specify a name.
Add a new style property or modify the value of an existing style property.
Provide a version for the style and click .
The style is installed in the repository and the style properties are identical to the added style property, except for the style property added in Step 8. The memory requirement is high because the common style properties are defined in both styles.
Creating new visualization styles
Requirement: CODESYS is open with a project containing a visualization.
Double-click the Visualization Manager object in the device tree.
The editor opens.
On the Settings tab, in the Style Settings group, click the
symbol.A list of commands opens.
Click the Open Style Editor command.
The Visualization Style Editor opens.
Click .
The Create New Visualization Style dialog opens.
Specify a name. Specify a base style.
Specify a directory and click OK to close the dialog.
The new style appears in the Visualization Style Editor.
Add a new style property.
Provide a version for the style and click .
The style is installed in the Visualization Styles Repository with the version number.
Adding a style property
Using the Visualization Style Editor, you can edit a style to save and install as a new version.
Requirement: The Visualization Style Editor is open with a style.
On the Style Properties tab, select a style property and click the command.
A new style property is added.
On the General tab, type a new version number in the Version setting.
Click .
The changes are saved and the style is installed in the repository as the new version.
Localizing style properties
You can assign a language-dependent name to a style property. CODESYS displays a style property by its localized name, depending on the language settings in in the International Settings category.
Requirement: The Visualization Style Editor is open with a style.
Translate the name of the style property into the localized language in the Localization tab.
Provide a version for the file on the General tab.
Click Save and Install.
The edited style is installed in the repository currently selected in CODESYS.
Update the style.
Set the language settings in CODESYS to the localized language.
Open a visualization and select an element. The style settings in its properties are displayed in the localized language.