Configuring and Multiplying Visualization Elements as Templates
A table can also be created to display data arrays in the following way. You multiply a single element that has at least one property which is described by a structured variable. To do this, the single element is configured as a "template" and multiplied by means of a command.
You can use the command to display array data in a visualization. The command multiplies a template element to create an element of the same type for each array component. The layout of the new elements in the visualization is one-dimensional as a row or column, or two-dimensional as a table.
To do this, drag an applicable element into the visualization editor. Then configure the properties of the element with array variables and specify the index access placeholder $FIRSTDIM$ as component access. If you have declared a multidimensional array, then you can use the second index access placeholder $SECONDDDIM$ for the additional dimension. Configure the remaining properties as usual with the typical values. The purpose is to create a valid template element. Then execute the command on the template element. Now the dialog with the same name opens. There you define in detail how many elements should be created and where they should be located.
After multiplying, the visualization contains as many of the same elements as are indexed using placeholders. In doing so, the settings in the Multiply Visu Element dialog are taken into consideration. All new elements in the properties that were preset with placeholders have these replaced with precise indexes. The remaining properties have been applied and copied without changes.
For example, you can have a layout of nine buttons as 3x3 tables, which are all the same size or the same color, but vary in the labeling. The labels are declared as a string array (nine components) and are passed as a value to the Texts->Text property.
Declaration of array variables
Example:
asText: ARRAY[1..3, 1..3] OF STRING;Element with applicable element type
Configuration of at least one property of the applicable element with array variables with index access placeholders
Example: Texts, Text property:
PLC_PRG.asText[$FIRSTDIM$, $SECONDDIM$]This is possible for all properties that permit a variable as a value (for example, also properties from the "Animation" or "Input" categories. To configure multiple properties for an element with arrays and index access placeholders, all arrays must have the same structure with the same dimension. The declarations have to be compatible.
Configuration of properties that do not vary (and are therefore the same for all generated elements) with the usual values without index access placeholders
Example:
sButtonTip : STRING := 'This element is created by multiplication'Texts, Tooltip property:
%sText variables, Tooltip variable property:
sButtonTip
Tip
You can still use the placeholder % as usual for the text display of variable values in the properties in Texts.
Visualization elements that can be multiplied:
Rectangle
Rounded Rectangle
Ellipse
Line
Polygon
Polyline
Bézier Curve
Image
Frame
Button
Pie
Spin Box
Text Field
Check Box
Image Switcher
Lamp
Dip Switch
Power Switch
Push Switch
Push Switch LED
Rocker Switch
Rotary Switch
Configuring and multiplying lamps and buttons as templates
Create a new standard project.
A CODESYS Control Win SL is configured as the device. The
MainTaskcallsPLC_PRG. The implementation language is ST.In
PLC_PRGin the program code, declare array variables with basic data typeSTRING.PROGRAM PLC_PRG VAR axLampIsOn: ARRAY[1..2,1..3] OF BOOL; // For lamp, property 'variable' and button, user input asButtonText: ARRAY[1..2,1..3] OF STRING := // Output text for button, property 'text variables''text variable' [ '1A Lamp', '2A Lamp', '1B Lamp', '2B Lamp', '1C Lamp', '2C Lamp' ]; END_VARSelect the application in the device tree and click .
In the Add Visualization dialog, specify the name
VisuMainand click Add to close the dialog.Drag a Lamp element from the Visualization ToolBox view to the visualization.
Configure the fixed property values.
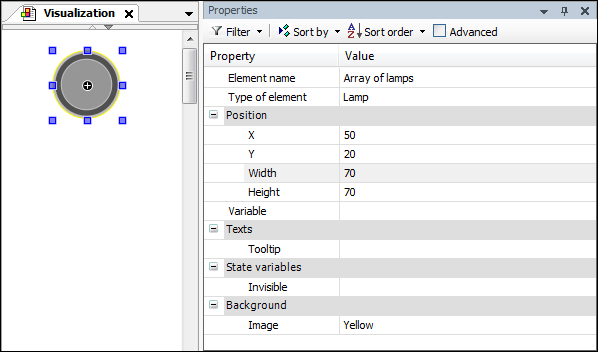
Double-click the value field of the Variable property.
The line editor opens.
Click the
 symbol.
The Input Assistant opens.
Select the array variable
PLC_PRG.axLampIsOnfrom the variable tree.Extend the string at the end, for example with "
[f".If you have activated SmartCoding (Options dialog, SmartCoding category, List components immediately when typing option), then the current variable list appears with the placeholders:
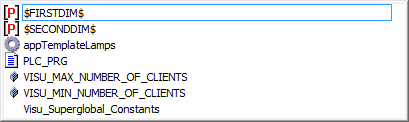
Select the placeholder
$FIRSTDIM$for the first dimension and confirm the selection.Extend the string at the end, for example with "
,s".The variable list appears again.
Select the placeholder
$SECONDDIM$for the second dimension and confirm the selection.Complete the string with a closing bracket.
PLC_PRG.axLampIsOn[$FIRSTDIM$, $SECONDDIM$]The lamp is configured as a template.
Click .
The Multiply Visu Element dialog opens. The default values are derived from the array declarations.
Total number of elements, Horizontal =
2Total number of elements, Vertical =
3Declare the distance between the new elements.
Offset between elements, Horizontal =
3Offset between elements, Vertical =
3Check the advanced settings.
Click OK to confirm the settings.
The new elements appear in the visualization editor. All properties are configured with a precise index and the array variables are indexed.
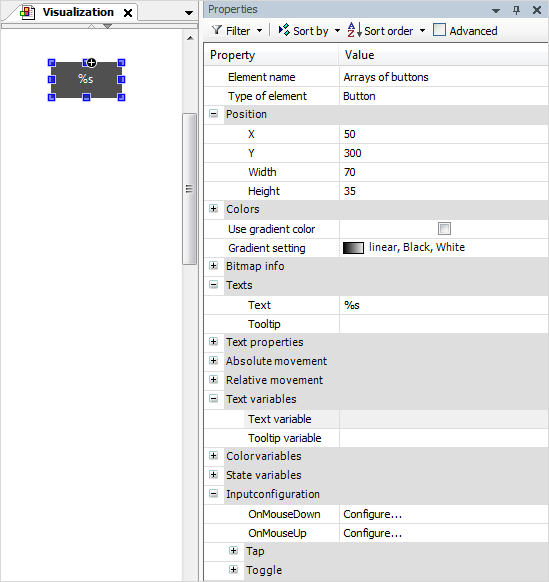
In the Visualization ToolBox, in the Common Controls category, drag the Button element to the visualization editor.
The Properties view of the element opens.
Configure the fixed property values.
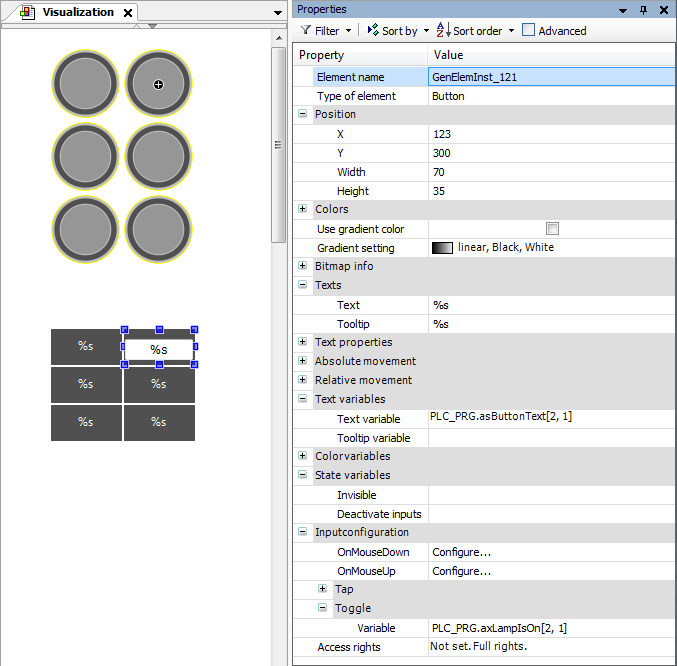
Configure the value for the Text variables->Text variable property.
PLC_PRG.asButtonText[$FIRSTDIM$, $SECONDDIM$]Configure the value for the Input configuration->Toggle->Variable property.
PLC_PRG.axLampIsOn[$FIRSTDIM$, $SECONDDIM$]The button is configured as a template.
Click .
The Multiply Visu Element dialog opens. The default values are derived from the array declarations.
Total number of elements, Horizontal =
2Total number of elements, Vertical =
3Declare the distance between the new elements.
Offset between elements, Horizontal =
3Offset between elements, Vertical =
3Check the advanced settings.
Click OK to confirm the settings.
The new elements appear in the visualization editor. All properties are configured with a precise index and the array variables are indexed.
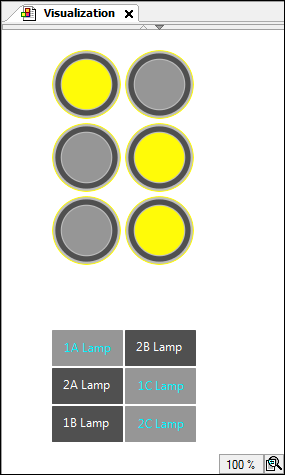
Build, start, and download the application.
Visualization at runtime:
Array variable with more than two dimensions
You can also configure the template element with array variables that have more than two dimensions, but you can only assign placeholders to a maximum of two of the dimensions. In the additional dimensions, the indexes are fixed.
Declaration
PROGRAM PLC_PRG
VAR
    asText: ARRAY[1..2, 1..3, 1..6, 1..2] OF STRING;
END_VAR
Configure the Text variables, Tooltip variable property for the template element:
PLC_PRG.asText[2, $FIRSTDIM$, $SECONDDIM$, 2]
Layout of a one-dimensional array in a table
You can configure the template element with a one-dimensional array by means of the index access placeholder $FIRSTDIM$. If the number of new elements to be created is greater than five, then a tabular layout is preset in the Multiply Visu Element dialog. The layout of the new elements is as quadratic as possible.
PROGRAM PLC_PRG
VAR
    asText: ARRAY[1..100] OF STRING;
END_VAR
The default setting in the Multiply Visu Element dialog allows for a layout of 100 new elements in a 10x10 field.