Setting Up the Safety Application
In the File menu, click New Project to create a new project.
In the New Project dialog, select an Empty project, or Empty Safety project (empty project with template for safety user management) and click the OK button.
In the Devices view, select the project (in the example: Safety_Project) to add the planned standard controllers (fieldbus master) to the project and click Add Device in the context menu.
Select each controller that should receive a safety controller.
Add the safety controller to selected standard controllers. To do this, select the standard controller, click Add Device in the context menu, and select the safety controller.
If you selected Empty Safety project in step 2, then now enter the "Owner" in the Current user field of the Log In dialog. The password is blank. Click the OK button.
When using the template with Safety user management, perform the additional steps in Further procedure for safety project with user management template.
Tip
When creating a safety project it is recommended to select the Empty Safety project template in the New project dialog. This template is an empty project with safety user configuration for the CODESYS Safety Extension user management.
Important
If you select Empty project as the template, you will have to completely build the user management yourself.
For a description of the user management and the safety user configuration, see: Setting Up User Management in the Project.
Tip
When selecting the Empty Safety project template, the Log In dialog appears when inserting the safety controller. The only users created are "Owner", "saf" and "ext"; the password is empty.
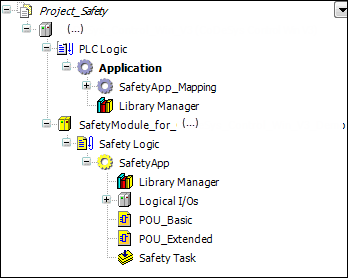
Safety Logic:
Logical node point of the safety controller, below which precisely one safety application object can be attached.
SafetyApp:
Node point below which the objects belonging to the safety application object are located.
Object that defines the execution version of the code and the currently safeguarded status (pin) of the application. For more information, see: Pinning
The editor of the object manages the list of objects currently belonging to the safety application object.
Library Manager:
Contains the libraries available on the inserted safety controller.
These are:
SafetyPLCopenSafetyStandardfurther device-dependent libraries, if necessary
Logical I/Os:
Node point to which logical I/O objects can be added. These added logical I/Os are used for the exchange of data and I/Os with the standard controller
Safety Task:
This object lists all programs that are loaded to, and executed on the controller.
Safety Basic POU
POU (program or function block) with Basic programming level
Safety Extended POU
POU (program or function block) with Extended programming level
Global variable list (Safety)
Declaration of the global variables valid only within the safety application object
Safety network variable list (Sender)
Safety network variable list (Receiver)
Further procedure for safety project with user management template
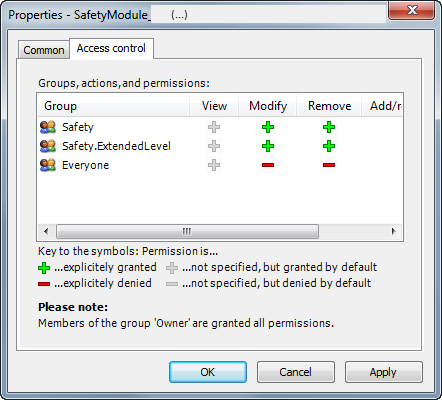
Open the properties dialog of the safety controller: Select the safety controller in the project tree and click Properties in the context menu.
Open the Access Control tab.
Open the cells in the Modify and Remove columns of the Everyone user group by double clicking, select Deny for each and confirm with OK.
Open the cells in the Modify and Remove columns of the Safety and Safety.ExtendedLevel user groups by double clicking, select Grant for each and confirm with OK.