Committing a Project and Boot Application to the CODESYS Automation Server and to a PLC
Note: If a connection is established from CODESYS to a PLC and the CODESYS Automation Server is connected to the PLC via an edge gateway, then CODESYS Automation Server might overwrite local changes on the PLC. For this purpose, a message is displayed in the message view in CODESYS when the connection to the PLC is established after opening the project in CODESYS for the first time.
Uploading a CODESYS project to the CODESYS Automation Server for the first time
The CODESYS Automation Server Connector package is installed in the CODESYS on your computer.
You have created a user account with a user name and password for accessing the CODESYS Automation Server. For detailed instructions, see Getting Started with the CODESYS Automation Server. If you are already working with a user account with enforced multi-factor authentication, then you need an app to scan a QR code and generate a token.
There are no compile errors when compiling all applications of the project.
Important
Applications from the following PLCs are not supported by the CODESYS Automation Server:
PLCs which require a "compact download". In particular, these are embedded and mini PLCs without a file system.
CODESYS Safety Extension SIL3 PLCs
CODESYS Safety for EtherCAT Safety Module PLCs
In CODESYS, open the project that you want to upload to the CODESYS Automation Server.
In CODESYS, click .
In the Commit to Server dialog, specify the Server URL, Project name that the project should have on the CODESYS Automation Server, and a Commit Message. Then click OK.
If the communication with the CODESYS Automation Server is running via a proxy server, then the Proxy Server – Sign In dialog opens first. In this dialog, you specify the Proxy URL, User name, and Password for the proxy server and then click OK.
In CODESYS, in the Automation Server – Sign In dialog, you now specify your User name and Password for the CODESYS Automation Server.
In the case that multi-factor authentication (MFA) is activated for your user account, you also have to enter the currently valid token when you sign in.
If MFA is not enforced, then you see the Save authentication option below the input for name and password. When it is activated, the credentials are saved until the next restart of CODESYS.
Your project, the project archive, and the boot application will be uploaded to the CODESYS Automation Server.
In the status bar in CODESYS, the
 symbol indicates that the project is connected to the CODESYS Automation Server.
Now your project is listed on the CODESYS Automation Server in . Now when you click the
 symbol here at your project, more project information and the boot application of the project are displayed.
Committing a boot application to a PLC
The CODESYS Automation Server Connector package is installed and your CODESYS project and the boot application have already been uploaded to the CODESYS Automation Server.
The CODESYS Automation Server is connected to the PLC.
To check this, click in the CODESYS Automation Server.
Sign in to your Automation Server.
In the displayed menu, click .
The List View window opens.
Click the
 Details button for the desired PLC.
The PLC Details view opens.
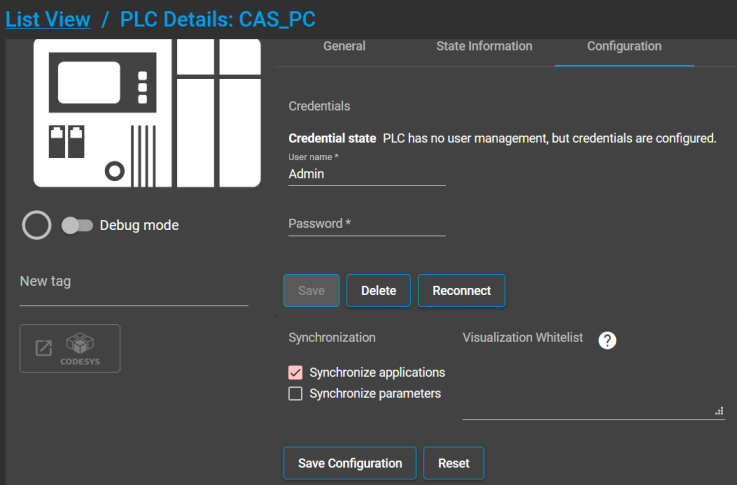
Select the Configuration tab.
Select the Synchronize applications option and click the Save Configuration button.
Note: If this option is not selected, then the update described in the following steps cannot be performed successfully on the PLC.
Select the menu and then click the application of your project.
The Application view opens.
Open the Deployment tab.
Those PLCs are displayed which are compatible with the application.
Select the Deploy option for the PLCs where the application should be downloaded. Then click the Apply Changes button.
The Apply Application Changes dialog opens.
In the dialog, you can check and confirm whether or not you really want to make the changes.
Now when you click the
 button in the PLC Details view () on the General tab, the application is displayed which was just transferred to the PLC.