スクリプトを使用してアクセスするCODESYS機能
すべてのオブジェクトとコマンドCODESYSスクリプトを提供するものも「scriptengine「Pythonモジュール。スクリプトが開始されるたびに暗黙的に<code>from scriptengine import *</code>結果に簡単にアクセスできます。CODESYSただし、スクリプトがアクセスを必要とするモジュールをインポートする場合CODESYS APIの場合、これらのモジュールはモジュールをインポートする必要がありますscriptengine彼ら自身。
以下の表は、Pythonスクリプトでエントリポイントとして使用できる主なオブジェクト(カテゴリ)を示しています。エントリポイントに関する詳細なドキュメントについては、APIリファレンスドキュメントを参照してください。CODESYSスクリプトエンジン: CODESYS スクリプト API。
オブジェクト | 説明 |
|---|---|
system | 一般へのアクセスCODESYS機能 例:
|
projects | アクセスCODESYS 3 つのナビゲータ ビュー (デバイス、POU、モジュール) を 1 つのプロジェクト ツリーに組み合わせたオブジェクト ツリーとしてのプロジェクト プロジェクトの読み込み、作成、保存、終了も可能 プロジェクト内のほとんどのオブジェクトには、コンパイル、ST POU へのアクセス、エクスポート、インポート、デバイス構成などの詳細な機能を備えた特別なメソッドがあります。 |
online | オンライン機能へのアクセス 例:
|
librarymanager | ライブラリリポジトリの管理とライブラリの表示、インストール、削除を可能にします |
device_repository | デバイスリポジトリの処理、デバイス記述のインポートとエクスポート |
modulerepository | 管理CODESYS Application ComposerモジュールとCODESYS Application Composerリポジトリ |
アクセス方法については、次のサンプルスクリプトを参照してください。CODESYS機能の詳細については、APIリファレンスドキュメントを参照してください。CODESYSスクリプトエンジン: CODESYS スクリプト API。
例: 現在のプロジェクトのデバイスツリーを印刷する
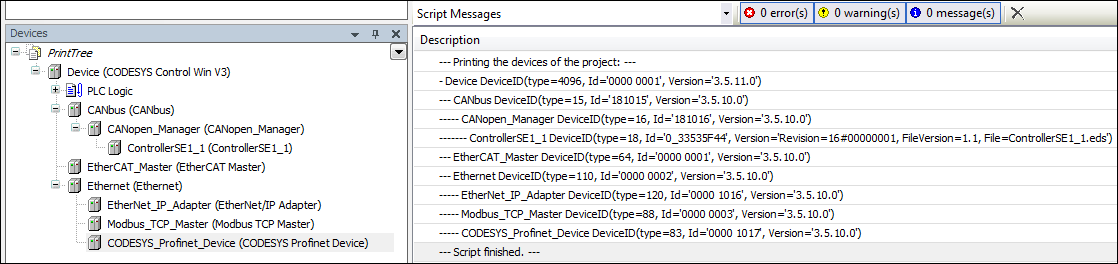
脚本PrintDeviceTree.pyプロジェクト内をナビゲートする例です。開いているプロジェクト内のすべてのデバイスの階層表示の出力を作成します。
いくつかのデバイス オブジェクトを含むプロジェクトをロードし、スクリプトを実行します。
PrintDeviceTree.py# encoding:utf-8
# We enable the new python 3 print syntax
from __future__ import print_function
# Prints out all devices in the currently open project.
print("--- Printing the devices of the project: ---")
# Define the printing function. This function starts with the
# so called "docstring" which is the recommended way to document
# functions in python.
def print_tree(treeobj, depth=0):
""" Print a device and all its children
Arguments:
treeobj -- the object to print
depth -- The current depth within the tree (default 0).
The argument 'depth' is used by recursive call and
should not be supplied by the user.
"""
# if the current object is a device, we print the name and device identification.
if treeobj.is_device:
name = treeobj.get_name(False)
deviceid = treeobj.get_device_identification()
print("{0}- {1} {2}".format("--"*depth, name, deviceid))
# we recursively call the print_tree function for the child objects.
for child in treeobj.get_children(False):
print_tree(child, depth+1)
# We iterate over all top level objects and call the print_tree function for them.
for obj in projects.primary.get_children():
print_tree(obj)
print("--- Script finished. ---")デバイス ツリー (「デバイス」ビューから) がメッセージ ビューに表示され、デバイス以外のオブジェクトはすべて除外されます。
例: 変数の読み取り
脚本ReadVariable.pyデバイスにログインし、必要に応じてアプリケーションを起動します。その後、変数の値がPLC_PRG.iVar1読み込まれ、出力されます。スクリプトを試すには、プロジェクトパスと変数名を変更する必要があります。
ReadVariable.py# encoding:utf-8
from __future__ import print_function
# close open project if necessary:
if projects.primary:
projects.primary.close()
# opens project
proj = projects.open(r"D:\data\projects\Ampel.project")
# set "Ampel.project" to active application
app = proj.active_application
onlineapp = online.create_online_application(app)
# login to device
onlineapp.login(OnlineChangeOption.Try, True)
# set status of application to "run", if not in "run"
if not onlineapp.application_state == ApplicationState.run:
onlineapp.start()
# wait 1 second
system.delay(1000)
# read value of iVar1
value = onlineapp.read_value("PLC_PRG.iVar1")
# display value in message view or command line
print(value)
# log out from device and close "Ampel.project"
onlineapp.logout()
proj.close()スクリプトの拡張ReadVariable.py、スクリプトMailVariables.pyレシピファイルから変数と式を読み込み、コントローラからそれらの現在の値を読み取ります。その後、これらの値は同じファイルに書き戻されます。さらに、Python SMTPライブラリを使用して、すべての変数のリストを含む添付ファイル付きのメールを送信します。
スクリプトを使用するには、パス、電子メール アドレス、SMTP サーバーの名前を環境に合わせて変更する必要があります。
MailVariables.py# encoding:utf-8
from __future__ import print_function
# Close current project if necessary and open "ScriptTest.project"
if not projects.primary == None:
projects.primary.close()
project = projects.open("D:\\Data\\projects\\scriptTest.project")
# retrieve active application
application = project.active_application
# create online application
online_application = online.create_online_application(application)
# login to application.
online_application.login(OnlineChangeOption.Try, True)
# start PLC if necessary
if not online_application.application_state == ApplicationState.run:
online_application.start()
# wait 2 seconds
system.delay(2000)
# open recipe file to read values.
recipe_input_file = open("D:\\Data\\projects\\RecipeInput.txt", "r")
watch_expressions = []
for watch_expression in recipe_input_file:
watch_expressions.append(watch_expression.strip())
print watch_expressions
# read values from the controllerd
watch_values = online_application.read_values(watch_expressions)
print watch_values
# open output file to write values
recipe_output_file = open("D:\\Data\\projects\\RecipeOutput.txt", "w")
for i in range(len(watch_expressions)):
recipe_output_file.write(watch_expressions[i])
recipe_output_file.write(" = ")
recipe_output_file.write(watch_values[i])
recipe_output_file.write("\n")
# Close files
recipe_input_file.close()
recipe_output_file.close()
# send Email
# import respective libraries
import smtplib
from email.mime.text import MIMEText
#open output file
recipe_output_file = open("D:\\Data\\projects\\RecipeOutput.txt", "r")
mail = MIMEText(recipe_output_file.read())
recipe_output_file.close()
#email address sender and recipient
fromm = "info@example.com"
to = "info@example.com"
# set sender and recipient
mail["Subject"] = "Attention value has changed"
mail["From"] = fromm
mail["To"] = to
# send email
smtp = smtplib.SMTP("name of smtp server")
smtp.sendmail(fromm, [to], mail.as_string())
smtp.quit()
# logout and close application
online_application.logout()
project.close()例: POUの作成と編集
脚本CreateDut.pyオブジェクトを作成するMyStruct、MyAlias、 そしてMyUnionの中でCODESYSプロジェクト。フォルダDataTypesすでに存在している必要があります。
CreateDut.py# encoding:utf-8
from __future__ import print_function
STRUCT_CONTENT = """\
a : BOOL;
b : BIT;
c : BIT;
"""
UNION_WHOLE = """\
TYPE MyUnion :
UNION
Zahl : INT;
Prozent : MyAlias;
Bits : MyStruct;
END_UNION
END_TYPE
"""
proj = projects.primary
folder = proj.find('DataTypes', recursive = True)[0]
# Create a struct DUT and insert the list of variables just into the right
# place in line two, row 0 (line numbering starts with line 0)
struktur = folder.create_dut('MyStruct') # DutType.Structure is the default
struktur.textual_declaration.insert(2, 0, STRUCT_CONTENT)
# Alias types get their "content" via the base type, which will just end up
# as one line in the declaration part:
# TYPE MyAlias : INT (0..100); END_TYPE
bereich = folder.create_dut('MyAlias', DutType.Alias, "INT (0..100)")
# Instead of injecting the variables into the existing declaration,
# one can also just replace the complete declaration part, including the
# boilerplate code.
union = folder.create_dut('MyUnion', DutType.Union)
union.textual_declaration.replace(UNION_WHOLE)例: ユーザーインターフェース / ユーザーとのインタラクション
場合によっては、スクリプトはユーザーとやり取りする必要があります。最も一般的なやり取りのために、いくつかのシンプルなAPIを提供しています。サンプルスクリプトSystem_UI_Test.pyこの点に関して可能なすべての機能を表示します。
System_UI_Test.py# encoding:utf-8
from __future__ import print_function
"""Performs some tests on the messagestore and UI."""
print("Some Error, Warning and Information popups:")
system.ui.error("Fatal error: Everything is OK. :-)")
system.ui.warning("Your bank account is surprisingly low")
system.ui.info("Just for your information: 42")
print("Now, we ask the user something.")
res = system.ui.prompt("Do you like this?", PromptChoice.YesNo, PromptResult.Yes);
print("The user selected '%s'" % res)
print("Now, the user can choose between custom options:")
res = system.ui.choose("Please choose:", ("First", 2, 7.5, "Something else"))
print("The user selected option '%s'" % str(res)) # res is a tuple
print("Now, the user can choose several options:")
res = system.ui.select_many("Please select one or more options", PromptChoice.OKCancel, PromptResult.OK, ("La Premiere", "The Second", "Das Dritte"))
print("The returned result is: '%s'" % str(res)) # res is a tuple
print("Now, the user can select files and directories")
res = system.ui.open_file_dialog("Choose multiple files:", filter="Text files (*.txt)|*.txt|Image Files(*.BMP;*.JPG;*.GIF)|*.BMP;*.JPG;*.GIF|All files (*.*)|*.*", filter_index = 0, multiselect=True)
print("The user did choose: '%s'" % str(res)) # res is a tuple as multiselect is true.
res = system.ui.save_file_dialog("Choose a file to save:", filter="Text files (*.txt)|*.txt|Image Files(*.BMP;*.JPG;*.GIF)|*.BMP;*.JPG;*.GIF|All files (*.*)|*.*", filter_index = 0)
print("The user did choose: '%s'" % res)
res = system.ui.browse_directory_dialog("Choose a directory", path="C:\\")
print("The user did choose: '%s'" % res)
print("Now we query a single line string")
res = system.ui.query_string("What's your name?")
print("Nice to meet you, dear %s." % res)
print("Now we query a multi line string")
res = system.ui.query_string("Please tell me a nice story about your life!", multi_line=True)
if (res):
print("Huh, that has been a long text, at least %s characters!" % len(res))
else:
print("Hey, don't be lazy!")
例: プロジェクト情報オブジェクトの操作
脚本ではProjectInfoExample.py、いくつかの情報を設定しますプロジェクト情報オブジェクト。最も重要な情報項目、例えばタイトルそしてバージョンは明示的なプロパティを持ちます。ただし、その他の情報フィールドは、dictionary構文。たとえば、ライブラリ プロジェクトのプロパティに推奨される構文などです。
以下の例はやや非現実的に見えるかもしれませんが、同様のコードは、自動ライブラリプロジェクトやその他のプロジェクトを作成、テストし、場合によってはリリースするビルドサーバーでも使用されています。ScriptEngineは、CI(継続的インテグレーション)およびCD(継続的デリバリー)システムを構築するための重要な要素の一つです。
ProjectInfoExample.py# encoding:utf-8
from __future__ import print_function
proj = projects.load("D:\Some.library")
info = proj.get_project_info()
# Set some values
info.company = "Test Library Ltd"
info.title = "Script Test Project"
info.version = (0, 8, 15, 4711)
info.default_namespace = "testlibrary"
info.author = "Python von Scriptinger"
# some values recommended in the library toolchain
info.values["DefaultNamespace"] = "testlibrary"
info.values["Placeholder"] = "testlibrary"
info.values["DocFormat"] = "reStructuredText"
# now we set a custom / vendor specific value.
info.values["SpecialDeviceId"] = "PLC0815_4711"
# Enable generation of Accessor functions, so the IEC
# application can display the version in an info screen.
info.change_accessor_generation(True)
# And set the library to released
info.released = True;
proj.save()例: 外部コマンドの呼び出しとPLCopenXMLファイルのインポート
サンプルスクリプトDeviceImportFromSVN.py外部プログラム(この場合はSVNクライアント)からPLCopenXMLファイルを取得し、新しく作成したCODESYSプロジェクト。
スクリプトを使用するには、環境へのパスを変更する必要があります。
DeviceImportFromSVN.py# encoding:utf-8
# Imports a Device in PLCopenXML from Subversion via command line svn client.
# We enable the new python 3 print syntax
from __future__ import print_function
import sys, os
# some variable definitions:
SVNEXE = r"C:\Program Files\Subversion\bin\svn.exe"
XMLURL = "file:///D:/testrepo/testfolder/TestExport.xml"
PROJECT = r"D:\test.project"
# clean up any open project:
if projects.primary:
projects.primary.close()
# Fetch the plcopenxml data from subversion.
# We'll catch the output of the program into the xmldata variable.
# The 'with' construct automatically closes the open pipe for us.
with os.popen('"' + SVNEXE + '" cat ' + XMLURL, 'r') as pipe:
xmldata = pipe.read()
# create a new project:
proj = projects.create(PROJECT)
# import the data into the project.
proj.import_xml(xmldata, False)
# and finally save. :-)
proj.save()
print("--- Script finished. ---")例: プロジェクトのアーカイブ
機能open_archive()そしてsave_archive()プロジェクトアーカイブを抽出したり、プロジェクトをプロジェクトアーカイブとして保存するためのスクリプト関数です。どちらの関数でも、ArchiveCategories指定できます。
このために、
open_archive()パラメータを受け入れるcategories_to_extract。save_archive()パラメータを受け入れるadditional_categories。
ArchiveCategoriesプロジェクトアーカイブのカテゴリは、次の場合にプロジェクトアーカイブとともに抽出されます。open_archive()または、プロジェクトアーカイブにアーカイブされます。save_archive()。
例: open_archive()
パラメータを指定したopen_archive()のさまざまな例categories_to_extract以下に示します。
デフォルトの動作 : categories_to_extract=None
もしcategories_to_extract明示的に指定されていない場合、パラメータは次のように設定されます。Noneすべてのカテゴリはプロジェクト アーカイブから取得され、抽出されます。
# Default
projects.open_archive(stArchiveFile=r"D:\Tests\Test.projectarchive", stProjectPath=r"D:\Tests", bOverwrite=True)
空のリスト : categories_to_extract=[]
パラメータcategories_to_extract空のリストで明示的に指定されている場合、プロジェクト アーカイブからカテゴリは取得されません。
# Passing empty list
projects.open_archive(stArchiveFile=r"D:\Tests\Test.projectarchive", stProjectPath=r"D:\Tests", bOverwrite=True, categories_to_extract=[])
複数のカテゴリ
パラメータには複数のカテゴリを指定できますcategories_to_extract指定したカテゴリのみ抽出されます。
# Multiple categories
projects.open_archive(stArchiveFile=r"D:\Tests\Test.projectarchive", stProjectPath=r"D:\Tests", bOverwrite=True, categories_to_extract=[ArchiveCategories.libraries, ArchiveCategories.devices])
起こりうるエラー
カテゴリーが指定されている場合はcategories_to_extract現在存在しないCODESYSインストールに失敗した場合はエラーメッセージが表示されます。不足しているカテゴリがインストールされるか、スクリプトのパラメータからカテゴリが削除されるまで、プロジェクトアーカイブを抽出できません。
例: save_archive()
様々な例save_archive()パラメータadditional_categories以下に示します。
デフォルトの動作
もしadditional_categories明示的に設定されていない場合は、CODESYSインターフェースもアーカイブされます。
カテゴリなし : additional_categories=None
もしadditional_categories明示的に設定されているNoneスクリプトで、カテゴリはアーカイブされません。
複数のカテゴリ
パラメータには複数のカテゴリを指定できますadditional_categories指定されたカテゴリのみがアーカイブに含まれます。
# Muliple categories
projects.save_archive(path=r"D:\Tests", comment="A new project", additional_files=[], additional_categories=[ArchiveCategories.libraries, ArchiveCategories.devices])
高度な例: SVN からライブラリを呼び出して CODESYS にインストールする
以下のサンプルスクリプトは、CT(継続的テスト)環境の一部としてライブラリの呼び出しとインストールを実行し、テストできるようにします。標準のCODESYS、CODESYS SVNアドオンも有効なライセンスを使用してインストールする必要があります。
import tempfile

if projects.primary:
    projects.primary.close()

tempdir = tempfile.mkdtemp()
URL = "svn://localhost/testrepo/trunk/SvnTestLibrary/"

proj = svn.checkout(URL, tempdir, "testlibrary", as_library=True)
proj.save()

repo = librarymanager.repositories[0]
librarymanager.install_library(proj.path, repo, True)

proj.close()