Utilizzo di script per l'accesso CODESYS Funzionalità
Tutti gli oggetti e i comandi che CODESYS fornisce per la scrittura di script sono disponibili anche in "scriptengine " Modulo Python. Ogni volta che viene avviato uno script, un implicito <code>from scriptengine import *</code> risultati. Ciò consente un facile accesso a CODESYS Tuttavia, se lo script importa moduli che richiedono l'accesso CODESYS API, quindi questi moduli devono importare il modulo scriptengine loro stessi.
Nella tabella seguente sono elencati i principali oggetti (categorie) che possono essere utilizzati negli script Python come punti di ingresso. Per una documentazione completa sui punti di ingresso, consultare la documentazione di riferimento API per CODESYS Motore di script: API di scripting CODESYS.
Oggetti | Descrizione |
|---|---|
system | Accesso generale CODESYS funzionalità Esempi:
|
projects | Accesso al CODESYS progetto come un albero di oggetti che combina le tre viste del navigatore (dispositivi, POU, moduli) in un albero di progetto Consente inoltre il caricamento, la creazione, il salvataggio e la chiusura dei progetti Per la maggior parte degli oggetti in un progetto, esistono metodi speciali con funzionalità dettagliate, ad esempio compilazione, accesso a ST POU, esportazione, importazione, configurazione del dispositivo, ecc. |
online | Accesso alle funzionalità online Esempi:
|
librarymanager | Consente la gestione dei repository di librerie e la visualizzazione, l'installazione e la rimozione delle librerie |
device_repository | Gestione dei repository dei dispositivi; importazione ed esportazione delle descrizioni dei dispositivi |
modulerepository | Gestione di CODESYS Application Composer moduli e CODESYS Application Composer repository |
Vedere i seguenti script di esempio specifici per i modi di accesso CODESYS funzionalità. Per informazioni dettagliate, consultare la documentazione di riferimento API per CODESYS Motore di script: API di scripting CODESYS.
Esempio: Stampa dell'albero dei dispositivi del progetto corrente
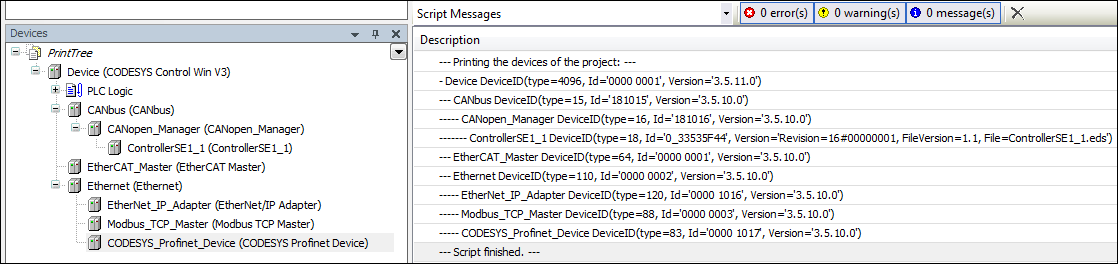
La sceneggiatura PrintDeviceTree.py è un esempio di navigazione in un progetto. Crea l'output di una visualizzazione gerarchica di tutti i dispositivi nel progetto aperto.
Caricare un progetto che contiene alcuni oggetti dispositivo ed eseguire lo script.
PrintDeviceTree.py# encoding:utf-8
# We enable the new python 3 print syntax
from __future__ import print_function
# Prints out all devices in the currently open project.
print("--- Printing the devices of the project: ---")
# Define the printing function. This function starts with the
# so called "docstring" which is the recommended way to document
# functions in python.
def print_tree(treeobj, depth=0):
""" Print a device and all its children
Arguments:
treeobj -- the object to print
depth -- The current depth within the tree (default 0).
The argument 'depth' is used by recursive call and
should not be supplied by the user.
"""
# if the current object is a device, we print the name and device identification.
if treeobj.is_device:
name = treeobj.get_name(False)
deviceid = treeobj.get_device_identification()
print("{0}- {1} {2}".format("--"*depth, name, deviceid))
# we recursively call the print_tree function for the child objects.
for child in treeobj.get_children(False):
print_tree(child, depth+1)
# We iterate over all top level objects and call the print_tree function for them.
for obj in projects.primary.get_children():
print_tree(obj)
print("--- Script finished. ---")L'albero dei dispositivi (dalla vista "Dispositivi") viene visualizzato nella vista dei messaggi e tutti gli oggetti non dispositivi vengono esclusi:
Esempio: Lettura delle variabili
La sceneggiatura ReadVariable.py accede al dispositivo e avvia l'applicazione se necessario. Quindi il valore della variabile PLC_PRG.iVar1 viene letto e restituito. Per provare lo script, è necessario modificare il percorso del progetto e i nomi delle variabili.
ReadVariable.py# encoding:utf-8
from __future__ import print_function
# close open project if necessary:
if projects.primary:
projects.primary.close()
# opens project
proj = projects.open(r"D:\data\projects\Ampel.project")
# set "Ampel.project" to active application
app = proj.active_application
onlineapp = online.create_online_application(app)
# login to device
onlineapp.login(OnlineChangeOption.Try, True)
# set status of application to "run", if not in "run"
if not onlineapp.application_state == ApplicationState.run:
onlineapp.start()
# wait 1 second
system.delay(1000)
# read value of iVar1
value = onlineapp.read_value("PLC_PRG.iVar1")
# display value in message view or command line
print(value)
# log out from device and close "Ampel.project"
onlineapp.logout()
proj.close()Nell'estensione dello script ReadVariable.py, la sceneggiatura MailVariables.py Carica variabili ed espressioni da un file di ricette e ne legge i valori correnti dal controller. Questi valori vengono quindi riscritti nello stesso file. Inoltre, utilizza la libreria SMTP di Python per inviare un'e-mail con un allegato contenente un elenco di tutte le variabili.
Per utilizzare lo script, è necessario modificare i percorsi, l'indirizzo e-mail e il nome del server SMTP in base al proprio ambiente.
MailVariables.py# encoding:utf-8
from __future__ import print_function
# Close current project if necessary and open "ScriptTest.project"
if not projects.primary == None:
projects.primary.close()
project = projects.open("D:\\Data\\projects\\scriptTest.project")
# retrieve active application
application = project.active_application
# create online application
online_application = online.create_online_application(application)
# login to application.
online_application.login(OnlineChangeOption.Try, True)
# start PLC if necessary
if not online_application.application_state == ApplicationState.run:
online_application.start()
# wait 2 seconds
system.delay(2000)
# open recipe file to read values.
recipe_input_file = open("D:\\Data\\projects\\RecipeInput.txt", "r")
watch_expressions = []
for watch_expression in recipe_input_file:
watch_expressions.append(watch_expression.strip())
print watch_expressions
# read values from the controllerd
watch_values = online_application.read_values(watch_expressions)
print watch_values
# open output file to write values
recipe_output_file = open("D:\\Data\\projects\\RecipeOutput.txt", "w")
for i in range(len(watch_expressions)):
recipe_output_file.write(watch_expressions[i])
recipe_output_file.write(" = ")
recipe_output_file.write(watch_values[i])
recipe_output_file.write("\n")
# Close files
recipe_input_file.close()
recipe_output_file.close()
# send Email
# import respective libraries
import smtplib
from email.mime.text import MIMEText
#open output file
recipe_output_file = open("D:\\Data\\projects\\RecipeOutput.txt", "r")
mail = MIMEText(recipe_output_file.read())
recipe_output_file.close()
#email address sender and recipient
fromm = "info@example.com"
to = "info@example.com"
# set sender and recipient
mail["Subject"] = "Attention value has changed"
mail["From"] = fromm
mail["To"] = to
# send email
smtp = smtplib.SMTP("name of smtp server")
smtp.sendmail(fromm, [to], mail.as_string())
smtp.quit()
# logout and close application
online_application.logout()
project.close()Esempio: creazione e modifica di POU
La sceneggiatura CreateDut.py crea gli oggetti MyStruct, MyAlias, E MyUnion nel CODESYS progetto. La cartella DataTypes deve già essere presente.
CreateDut.py# encoding:utf-8
from __future__ import print_function
STRUCT_CONTENT = """\
a : BOOL;
b : BIT;
c : BIT;
"""
UNION_WHOLE = """\
TYPE MyUnion :
UNION
Zahl : INT;
Prozent : MyAlias;
Bits : MyStruct;
END_UNION
END_TYPE
"""
proj = projects.primary
folder = proj.find('DataTypes', recursive = True)[0]
# Create a struct DUT and insert the list of variables just into the right
# place in line two, row 0 (line numbering starts with line 0)
struktur = folder.create_dut('MyStruct') # DutType.Structure is the default
struktur.textual_declaration.insert(2, 0, STRUCT_CONTENT)
# Alias types get their "content" via the base type, which will just end up
# as one line in the declaration part:
# TYPE MyAlias : INT (0..100); END_TYPE
bereich = folder.create_dut('MyAlias', DutType.Alias, "INT (0..100)")
# Instead of injecting the variables into the existing declaration,
# one can also just replace the complete declaration part, including the
# boilerplate code.
union = folder.create_dut('MyUnion', DutType.Union)
union.textual_declaration.replace(UNION_WHOLE)Esempio: Interfaccia utente / Interazione con l'utente
In alcuni casi, gli script devono interagire con l'utente. Forniamo alcune semplici API per le interazioni più comuni. Lo script di esempio System_UI_Test.py mostra tutte le possibili funzioni a questo riguardo.
System_UI_Test.py# encoding:utf-8
from __future__ import print_function
"""Performs some tests on the messagestore and UI."""
print("Some Error, Warning and Information popups:")
system.ui.error("Fatal error: Everything is OK. :-)")
system.ui.warning("Your bank account is surprisingly low")
system.ui.info("Just for your information: 42")
print("Now, we ask the user something.")
res = system.ui.prompt("Do you like this?", PromptChoice.YesNo, PromptResult.Yes);
print("The user selected '%s'" % res)
print("Now, the user can choose between custom options:")
res = system.ui.choose("Please choose:", ("First", 2, 7.5, "Something else"))
print("The user selected option '%s'" % str(res)) # res is a tuple
print("Now, the user can choose several options:")
res = system.ui.select_many("Please select one or more options", PromptChoice.OKCancel, PromptResult.OK, ("La Premiere", "The Second", "Das Dritte"))
print("The returned result is: '%s'" % str(res)) # res is a tuple
print("Now, the user can select files and directories")
res = system.ui.open_file_dialog("Choose multiple files:", filter="Text files (*.txt)|*.txt|Image Files(*.BMP;*.JPG;*.GIF)|*.BMP;*.JPG;*.GIF|All files (*.*)|*.*", filter_index = 0, multiselect=True)
print("The user did choose: '%s'" % str(res)) # res is a tuple as multiselect is true.
res = system.ui.save_file_dialog("Choose a file to save:", filter="Text files (*.txt)|*.txt|Image Files(*.BMP;*.JPG;*.GIF)|*.BMP;*.JPG;*.GIF|All files (*.*)|*.*", filter_index = 0)
print("The user did choose: '%s'" % res)
res = system.ui.browse_directory_dialog("Choose a directory", path="C:\\")
print("The user did choose: '%s'" % res)
print("Now we query a single line string")
res = system.ui.query_string("What's your name?")
print("Nice to meet you, dear %s." % res)
print("Now we query a multi line string")
res = system.ui.query_string("Please tell me a nice story about your life!", multi_line=True)
if (res):
print("Huh, that has been a long text, at least %s characters!" % len(res))
else:
print("Hey, don't be lazy!")
Esempio: manipolazione dell'oggetto Informazioni sul progetto
Nella sceneggiatura ProjectInfoExample.py, abbiamo impostato alcune informazioni nel Informazioni sul progetto oggetto. Le informazioni più importanti, come Titolo E Versione, hanno proprietà esplicite. Tuttavia, è possibile leggere e scrivere qualsiasi altro campo informativo tramite dictionary sintassi. Ad esempio, quelli consigliati per le proprietà di un progetto di libreria.
L'esempio seguente potrebbe sembrare un po' irrealistico, ma un codice simile viene utilizzato nei server di build che creano, testano e, se necessario, rilasciano automaticamente progetti di librerie e altri progetti. ScriptEngine è uno degli elementi chiave per la creazione di sistemi CI (Continuous Integration) e CD (Continuous Delivery).
ProjectInfoExample.py# encoding:utf-8
from __future__ import print_function
proj = projects.load("D:\Some.library")
info = proj.get_project_info()
# Set some values
info.company = "Test Library Ltd"
info.title = "Script Test Project"
info.version = (0, 8, 15, 4711)
info.default_namespace = "testlibrary"
info.author = "Python von Scriptinger"
# some values recommended in the library toolchain
info.values["DefaultNamespace"] = "testlibrary"
info.values["Placeholder"] = "testlibrary"
info.values["DocFormat"] = "reStructuredText"
# now we set a custom / vendor specific value.
info.values["SpecialDeviceId"] = "PLC0815_4711"
# Enable generation of Accessor functions, so the IEC
# application can display the version in an info screen.
info.change_accessor_generation(True)
# And set the library to released
info.released = True;
proj.save()Esempio: chiamata di comandi esterni e importazione di file PLCopenXML
Lo script di esempio DeviceImportFromSVN.py ottiene un file PLCopenXML da un programma esterno (in questo caso un client SVN) e lo importa in un nuovo file creato CODESYS progetto.
Per utilizzare lo script, è necessario modificare i percorsi del proprio ambiente.
DeviceImportFromSVN.py# encoding:utf-8
# Imports a Device in PLCopenXML from Subversion via command line svn client.
# We enable the new python 3 print syntax
from __future__ import print_function
import sys, os
# some variable definitions:
SVNEXE = r"C:\Program Files\Subversion\bin\svn.exe"
XMLURL = "file:///D:/testrepo/testfolder/TestExport.xml"
PROJECT = r"D:\test.project"
# clean up any open project:
if projects.primary:
projects.primary.close()
# Fetch the plcopenxml data from subversion.
# We'll catch the output of the program into the xmldata variable.
# The 'with' construct automatically closes the open pipe for us.
with os.popen('"' + SVNEXE + '" cat ' + XMLURL, 'r') as pipe:
xmldata = pipe.read()
# create a new project:
proj = projects.create(PROJECT)
# import the data into the project.
proj.import_xml(xmldata, False)
# and finally save. :-)
proj.save()
print("--- Script finished. ---")Esempi: Archiviazione del progetto
Le funzioni open_archive() E save_archive() sono funzioni di scripting per estrarre un archivio di progetto o salvare un progetto come archivio di progetto. Per entrambe le funzioni, ArchiveCategories può essere specificato.
Per questo,
open_archive()accetta il parametrocategories_to_extract.save_archive()accetta il parametroadditional_categories.
ArchiveCategories sono categorie di archivio di progetto che vengono estratte con l'archivio di progetto nel caso di open_archive() o archiviato con l'archivio del progetto nel caso di save_archive().
Esempi: open_archive()
Vari esempi di open_archive() con il parametro categories_to_extract sono presentati di seguito:
Comportamento predefinito: categories_to_extract=None
Se categories_to_extract non sono specificati esplicitamente, allora il parametro è impostato su None Tutte le categorie vengono estratte dall'archivio del progetto.
# Default
projects.open_archive(stArchiveFile=r"D:\Tests\Test.projectarchive", stProjectPath=r"D:\Tests", bOverwrite=True)
Elenco vuoto: categories_to_extract=[]
Se il parametro categories_to_extract è specificato esplicitamente con un elenco vuoto, quindi nessuna categoria viene estratta dall'archivio del progetto.
# Passing empty list
projects.open_archive(stArchiveFile=r"D:\Tests\Test.projectarchive", stProjectPath=r"D:\Tests", bOverwrite=True, categories_to_extract=[])
Categorie multiple
È possibile specificare più categorie nel parametro categories_to_extract Vengono estratte solo le categorie specificate.
# Multiple categories
projects.open_archive(stArchiveFile=r"D:\Tests\Test.projectarchive", stProjectPath=r"D:\Tests", bOverwrite=True, categories_to_extract=[ArchiveCategories.libraries, ArchiveCategories.devices])
Possibili errori
Se le categorie sono specificate in categories_to_extract che non esistono nel presente CODESYS installazione, viene visualizzato un messaggio di errore. L'archivio del progetto non può essere estratto finché la categoria mancante non viene installata o rimossa dal parametro nello script.
Esempi: save_archive()
Vari esempi di save_archive() con il parametro additional_categories sono presentati di seguito:
Comportamento predefinito
Se additional_categories non sono impostati esplicitamente, allora le categorie predefinite del CODESYS anche l'interfaccia viene archiviata.
Nessuna categoria: additional_categories=None
Se additional_categories è impostato esplicitamente su None nello script, nessuna categoria verrà archiviata.
Categorie multiple
È possibile specificare più categorie nel parametro additional_categories Solo le categorie specificate verranno incluse nell'archivio.
# Muliple categories
projects.save_archive(path=r"D:\Tests", comment="A new project", additional_files=[], additional_categories=[ArchiveCategories.libraries, ArchiveCategories.devices])
Esempio avanzato: chiamata di una libreria da SVN e installazione in CODESYS
Il seguente script di esempio può eseguire la chiamata e l'installazione di una libreria come parte di un ambiente CT (Continuous Testing), in modo che possano essere testate. Oltre allo standard:CODESYS, IL CODESYS SVN Anche il componente aggiuntivo deve essere installato con una licenza valida.
import tempfile

if projects.primary:
    projects.primary.close()

tempdir = tempfile.mkdtemp()
URL = "svn://localhost/testrepo/trunk/SvnTestLibrary/"

proj = svn.checkout(URL, tempdir, "testlibrary", as_library=True)
proj.save()

repo = librarymanager.repositories[0]
librarymanager.install_library(proj.path, repo, True)

proj.close()