Uso de scripts para acceder CODESYS Funcionalidades
Todos los objetos y comandos que CODESYS También se dispone de scripts en "scriptengine "Módulo Python. Siempre que se inicia un script, se genera una <code>from scriptengine import *</code> resultados. Esto permite un fácil acceso a CODESYS. Sin embargo, si su script importa módulos que requieren acceso CODESYS API, entonces estos módulos tienen que importar el módulo scriptengine ellos mismos.
En la siguiente tabla, encontrará los principales objetos (categorías) que se pueden usar como puntos de entrada en scripts de Python. Para obtener documentación completa sobre los puntos de entrada, consulte la documentación de referencia de la API. CODESYS Motor de script: API de scripting de CODESYS.
Objetos | Descripción |
|---|---|
system | Acceso a información general CODESYS funcionalidades Ejemplos:
|
projects | Acceso a la CODESYS Proyecto como un árbol de objetos que combina las tres vistas del navegador (dispositivos, POU, módulos) en un árbol de proyecto También permite cargar, crear, guardar y cerrar proyectos. Para la mayoría de los objetos de un proyecto, existen métodos especiales con funcionalidad detallada, por ejemplo, compilación, acceso a ST POU, exportación, importación, configuración del dispositivo, etc. |
online | Acceso a funcionalidades en línea Ejemplos:
|
librarymanager | Permite la gestión de repositorios de bibliotecas y la visualización, instalación y eliminación de bibliotecas. |
device_repository | Manejo de repositorios de dispositivos; importación y exportación de descripciones de dispositivos |
modulerepository | Gestión de CODESYS Application Composer módulos y CODESYS Application Composer repositorios |
Consulte los siguientes scripts de muestra específicos para conocer las formas de acceder CODESYS funcionalidades. Para obtener información detallada, consulte la documentación de referencia de la API. CODESYS Motor de script: API de scripting de CODESYS.
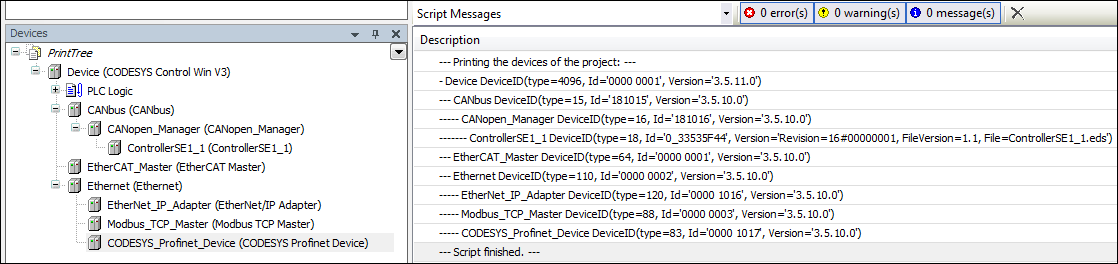
Ejemplo: Impresión del árbol de dispositivos del proyecto actual
El guión PrintDeviceTree.py Es un ejemplo de navegación en un proyecto. Crea una visualización jerárquica de todos los dispositivos del proyecto abierto.
Cargue un proyecto que contenga algunos objetos de dispositivo y ejecute el script.
PrintDeviceTree.py# encoding:utf-8
# We enable the new python 3 print syntax
from __future__ import print_function
# Prints out all devices in the currently open project.
print("--- Printing the devices of the project: ---")
# Define the printing function. This function starts with the
# so called "docstring" which is the recommended way to document
# functions in python.
def print_tree(treeobj, depth=0):
""" Print a device and all its children
Arguments:
treeobj -- the object to print
depth -- The current depth within the tree (default 0).
The argument 'depth' is used by recursive call and
should not be supplied by the user.
"""
# if the current object is a device, we print the name and device identification.
if treeobj.is_device:
name = treeobj.get_name(False)
deviceid = treeobj.get_device_identification()
print("{0}- {1} {2}".format("--"*depth, name, deviceid))
# we recursively call the print_tree function for the child objects.
for child in treeobj.get_children(False):
print_tree(child, depth+1)
# We iterate over all top level objects and call the print_tree function for them.
for obj in projects.primary.get_children():
print_tree(obj)
print("--- Script finished. ---")El árbol de dispositivos (de la vista "Dispositivos") se muestra en la vista de mensajes y se omiten todos los objetos que no son dispositivos:
Ejemplo: Lectura de variables
El guión ReadVariable.py inicia sesión en el dispositivo e inicia la aplicación si es necesario. Luego, el valor de la variable PLC_PRG.iVar1 Se lee y se emite. Para probar el script, debe modificar la ruta del proyecto y los nombres de las variables.
ReadVariable.py# encoding:utf-8
from __future__ import print_function
# close open project if necessary:
if projects.primary:
projects.primary.close()
# opens project
proj = projects.open(r"D:\data\projects\Ampel.project")
# set "Ampel.project" to active application
app = proj.active_application
onlineapp = online.create_online_application(app)
# login to device
onlineapp.login(OnlineChangeOption.Try, True)
# set status of application to "run", if not in "run"
if not onlineapp.application_state == ApplicationState.run:
onlineapp.start()
# wait 1 second
system.delay(1000)
# read value of iVar1
value = onlineapp.read_value("PLC_PRG.iVar1")
# display value in message view or command line
print(value)
# log out from device and close "Ampel.project"
onlineapp.logout()
proj.close()En la extensión del script ReadVariable.py, el guión MailVariables.py Carga variables y expresiones de un archivo de receta y lee sus valores actuales desde el controlador. Estos valores se vuelven a escribir en el mismo archivo. Además, utiliza la biblioteca SMTP de Python para enviar un correo electrónico con un archivo adjunto que contiene una lista de todas las variables.
Para utilizar el script, debe modificar las rutas, la dirección de correo electrónico y el nombre del servidor SMTP de su entorno.
MailVariables.py# encoding:utf-8
from __future__ import print_function
# Close current project if necessary and open "ScriptTest.project"
if not projects.primary == None:
projects.primary.close()
project = projects.open("D:\\Data\\projects\\scriptTest.project")
# retrieve active application
application = project.active_application
# create online application
online_application = online.create_online_application(application)
# login to application.
online_application.login(OnlineChangeOption.Try, True)
# start PLC if necessary
if not online_application.application_state == ApplicationState.run:
online_application.start()
# wait 2 seconds
system.delay(2000)
# open recipe file to read values.
recipe_input_file = open("D:\\Data\\projects\\RecipeInput.txt", "r")
watch_expressions = []
for watch_expression in recipe_input_file:
watch_expressions.append(watch_expression.strip())
print watch_expressions
# read values from the controllerd
watch_values = online_application.read_values(watch_expressions)
print watch_values
# open output file to write values
recipe_output_file = open("D:\\Data\\projects\\RecipeOutput.txt", "w")
for i in range(len(watch_expressions)):
recipe_output_file.write(watch_expressions[i])
recipe_output_file.write(" = ")
recipe_output_file.write(watch_values[i])
recipe_output_file.write("\n")
# Close files
recipe_input_file.close()
recipe_output_file.close()
# send Email
# import respective libraries
import smtplib
from email.mime.text import MIMEText
#open output file
recipe_output_file = open("D:\\Data\\projects\\RecipeOutput.txt", "r")
mail = MIMEText(recipe_output_file.read())
recipe_output_file.close()
#email address sender and recipient
fromm = "info@example.com"
to = "info@example.com"
# set sender and recipient
mail["Subject"] = "Attention value has changed"
mail["From"] = fromm
mail["To"] = to
# send email
smtp = smtplib.SMTP("name of smtp server")
smtp.sendmail(fromm, [to], mail.as_string())
smtp.quit()
# logout and close application
online_application.logout()
project.close()Ejemplo: Creación y edición de POU
El guión CreateDut.py crea los objetos MyStruct, MyAlias, y MyUnion en el CODESYS proyecto. La carpeta DataTypes ya tiene que estar presente.
CreateDut.py# encoding:utf-8
from __future__ import print_function
STRUCT_CONTENT = """\
a : BOOL;
b : BIT;
c : BIT;
"""
UNION_WHOLE = """\
TYPE MyUnion :
UNION
Zahl : INT;
Prozent : MyAlias;
Bits : MyStruct;
END_UNION
END_TYPE
"""
proj = projects.primary
folder = proj.find('DataTypes', recursive = True)[0]
# Create a struct DUT and insert the list of variables just into the right
# place in line two, row 0 (line numbering starts with line 0)
struktur = folder.create_dut('MyStruct') # DutType.Structure is the default
struktur.textual_declaration.insert(2, 0, STRUCT_CONTENT)
# Alias types get their "content" via the base type, which will just end up
# as one line in the declaration part:
# TYPE MyAlias : INT (0..100); END_TYPE
bereich = folder.create_dut('MyAlias', DutType.Alias, "INT (0..100)")
# Instead of injecting the variables into the existing declaration,
# one can also just replace the complete declaration part, including the
# boilerplate code.
union = folder.create_dut('MyUnion', DutType.Union)
union.textual_declaration.replace(UNION_WHOLE)Ejemplo: Interfaz de usuario / Interacción con el usuario
En algunos casos, los scripts deben interactuar con el usuario. Ofrecemos algunas API sencillas para las interacciones más comunes. El script de ejemplo... System_UI_Test.py muestra todas las funciones posibles a este respecto.
System_UI_Test.py# encoding:utf-8
from __future__ import print_function
"""Performs some tests on the messagestore and UI."""
print("Some Error, Warning and Information popups:")
system.ui.error("Fatal error: Everything is OK. :-)")
system.ui.warning("Your bank account is surprisingly low")
system.ui.info("Just for your information: 42")
print("Now, we ask the user something.")
res = system.ui.prompt("Do you like this?", PromptChoice.YesNo, PromptResult.Yes);
print("The user selected '%s'" % res)
print("Now, the user can choose between custom options:")
res = system.ui.choose("Please choose:", ("First", 2, 7.5, "Something else"))
print("The user selected option '%s'" % str(res)) # res is a tuple
print("Now, the user can choose several options:")
res = system.ui.select_many("Please select one or more options", PromptChoice.OKCancel, PromptResult.OK, ("La Premiere", "The Second", "Das Dritte"))
print("The returned result is: '%s'" % str(res)) # res is a tuple
print("Now, the user can select files and directories")
res = system.ui.open_file_dialog("Choose multiple files:", filter="Text files (*.txt)|*.txt|Image Files(*.BMP;*.JPG;*.GIF)|*.BMP;*.JPG;*.GIF|All files (*.*)|*.*", filter_index = 0, multiselect=True)
print("The user did choose: '%s'" % str(res)) # res is a tuple as multiselect is true.
res = system.ui.save_file_dialog("Choose a file to save:", filter="Text files (*.txt)|*.txt|Image Files(*.BMP;*.JPG;*.GIF)|*.BMP;*.JPG;*.GIF|All files (*.*)|*.*", filter_index = 0)
print("The user did choose: '%s'" % res)
res = system.ui.browse_directory_dialog("Choose a directory", path="C:\\")
print("The user did choose: '%s'" % res)
print("Now we query a single line string")
res = system.ui.query_string("What's your name?")
print("Nice to meet you, dear %s." % res)
print("Now we query a multi line string")
res = system.ui.query_string("Please tell me a nice story about your life!", multi_line=True)
if (res):
print("Huh, that has been a long text, at least %s characters!" % len(res))
else:
print("Hey, don't be lazy!")
Ejemplo: Manipulación del objeto de información del proyecto
En el guion ProjectInfoExample.py, establecemos alguna información en el Información del proyecto objeto. Los elementos de información más importantes, como Título y Versión, tienen propiedades explícitas. Sin embargo, puede leer y escribir cualquier otro campo de información mediante dictionary Sintaxis. Por ejemplo, las recomendadas para las propiedades de un proyecto de biblioteca.
El siguiente ejemplo puede parecer poco realista, pero se utiliza un código similar en servidores de compilación que crean, prueban y, posiblemente, lanzan proyectos de bibliotecas automáticas y otros proyectos. ScriptEngine es uno de los elementos clave para crear sistemas de CI (Integración Continua) y CD (Entrega Continua).
ProjectInfoExample.py# encoding:utf-8
from __future__ import print_function
proj = projects.load("D:\Some.library")
info = proj.get_project_info()
# Set some values
info.company = "Test Library Ltd"
info.title = "Script Test Project"
info.version = (0, 8, 15, 4711)
info.default_namespace = "testlibrary"
info.author = "Python von Scriptinger"
# some values recommended in the library toolchain
info.values["DefaultNamespace"] = "testlibrary"
info.values["Placeholder"] = "testlibrary"
info.values["DocFormat"] = "reStructuredText"
# now we set a custom / vendor specific value.
info.values["SpecialDeviceId"] = "PLC0815_4711"
# Enable generation of Accessor functions, so the IEC
# application can display the version in an info screen.
info.change_accessor_generation(True)
# And set the library to released
info.released = True;
proj.save()Ejemplo: Llamar comandos externos e importar archivos PLCopenXML
El guión de muestra DeviceImportFromSVN.py Obtiene un archivo PLCopenXML de un programa externo (en este caso, un cliente SVN) y lo importa en un nuevo programa creado. CODESYS proyecto.
Para utilizar el script, debe modificar las rutas de su entorno.
DeviceImportFromSVN.py# encoding:utf-8
# Imports a Device in PLCopenXML from Subversion via command line svn client.
# We enable the new python 3 print syntax
from __future__ import print_function
import sys, os
# some variable definitions:
SVNEXE = r"C:\Program Files\Subversion\bin\svn.exe"
XMLURL = "file:///D:/testrepo/testfolder/TestExport.xml"
PROJECT = r"D:\test.project"
# clean up any open project:
if projects.primary:
projects.primary.close()
# Fetch the plcopenxml data from subversion.
# We'll catch the output of the program into the xmldata variable.
# The 'with' construct automatically closes the open pipe for us.
with os.popen('"' + SVNEXE + '" cat ' + XMLURL, 'r') as pipe:
xmldata = pipe.read()
# create a new project:
proj = projects.create(PROJECT)
# import the data into the project.
proj.import_xml(xmldata, False)
# and finally save. :-)
proj.save()
print("--- Script finished. ---")Ejemplos: Archivado de proyectos
Las funciones open_archive() y save_archive() Son funciones de script para extraer un archivo de proyecto o guardarlo como archivo de proyecto. Para ambas funciones, ArchiveCategories se puede especificar
Para esto,
open_archive()acepta el parámetrocategories_to_extract.save_archive()acepta el parámetroadditional_categories.
ArchiveCategories son categorías de archivo de proyecto que se extraen con el archivo de proyecto en el caso de open_archive() o archivados con el archivo del proyecto en el caso de save_archive().
Ejemplos: open_archive()
Varios ejemplos de open_archive() con el parámetro categories_to_extract se presentan a continuación:
Comportamiento predeterminado: categories_to_extract=None
Si categories_to_extract no se especifican explícitamente, entonces el parámetro se establece en None Todas las categorías se extraen del archivo del proyecto.
# Default
projects.open_archive(stArchiveFile=r"D:\Tests\Test.projectarchive", stProjectPath=r"D:\Tests", bOverwrite=True)
Lista vacía: categories_to_extract=[]
Si el parámetro categories_to_extract se especifica explícitamente con una lista vacía, entonces no se extraen categorías del archivo del proyecto.
# Passing empty list
projects.open_archive(stArchiveFile=r"D:\Tests\Test.projectarchive", stProjectPath=r"D:\Tests", bOverwrite=True, categories_to_extract=[])
Varias categorías
Se pueden especificar varias categorías en el parámetro categories_to_extract. Sólo se extraen las categorías especificadas.
# Multiple categories
projects.open_archive(stArchiveFile=r"D:\Tests\Test.projectarchive", stProjectPath=r"D:\Tests", bOverwrite=True, categories_to_extract=[ArchiveCategories.libraries, ArchiveCategories.devices])
Posibles errores
Si se especifican categorías en categories_to_extract que no existen en la actualidad CODESYS Tras la instalación, se mostrará un mensaje de error. El archivo del proyecto no se podrá extraer hasta que se instale la categoría faltante o se elimine del parámetro en el script.
Ejemplos: save_archive()
Varios ejemplos de save_archive() con el parámetro additional_categories se presentan a continuación:
Comportamiento predeterminado
Si additional_categories no se establecen explícitamente, entonces las categorías predeterminadas de la CODESYS Las interfaces también están archivadas.
Sin categorías: additional_categories=None
Si additional_categories se establece explícitamente en None en el script, entonces no se archivarán categorías.
Varias categorías
Se pueden especificar varias categorías en el parámetro additional_categories. Sólo las categorías especificadas se incluirán en el archivo.
# Muliple categories
projects.save_archive(path=r"D:\Tests", comment="A new project", additional_files=[], additional_categories=[ArchiveCategories.libraries, ArchiveCategories.devices])
Ejemplo avanzado: llamar a una biblioteca desde SVN e instalarla en CODESYS
El siguiente script de ejemplo permite llamar e instalar una biblioteca como parte de un entorno de CT (Pruebas Continuas) para que se puedan probar. Además de las pruebas estándar,CODESYS, el CODESYS SVN El complemento también debe instalarse con una licencia válida.
import tempfile

if projects.primary:
    projects.primary.close()

tempdir = tempfile.mkdtemp()
URL = "svn://localhost/testrepo/trunk/SvnTestLibrary/"

proj = svn.checkout(URL, tempdir, "testlibrary", as_library=True)
proj.save()

repo = librarymanager.repositories[0]
librarymanager.install_library(proj.path, repo, True)

proj.close()