Handling of User Management and Permissions for the Device
For devices which support a device user management, the device editor includes the Users and groups and access rights tabs. When offered by the device, you can view the user management for the device here as well as edit it in synchronization mode (not in online mode). Here, you can grant or deny specific permissions on the controller to the defined user groups. Then users need the credentials defined here to log in to the controller.
The device user management can already be set up in the device description.
Note
For CODESYS Control for <device> SL with version >= 3.5 SP17, user management is enforced as a communication policy by default. For older versions back to 3.5 SP14, it must be explicitly enabled and enforced. Even older versions only offer very simple user management.
Tip
Note the commands in the menu. You can easily add, edit, or remove a user account on the controller where you are currently logged in.
Tip
In order for the Access Rights tab to be available in the device editor, the corresponding CODESYS option must be enabled in the device editor and unlocked in the device description. If the device editor dialog is not available, then contact the vendor of the controller.
Permissions can be granted to groups only, not individual users. Therefore, every user must be a member of a group. There are predefined default user groups (see below). These and additional groups and users are configured in the device editor on the Users and Groups tab. After the user management has been set up on the controller, you can configure the permissions to it.
If the user management of a device is not yet "active", then it can be enabled by one of the following actions:
Switch to synchronized mode in the device editor on the Users and Groups tab.
Add a new user by using the command.
Agree after being prompted to enable when establishing the connection and login to the controller for the first-time.
Tip
For CODESYS Control devices, a user management is enforced by default.
Default user groups in the device user management of CODESYS Control
There are the following predefined user groups:
Administrator: All permissions.
When you log in to the PLC for the first time, you will be instructed to enable the device user management and then create a user in the Administrator group. As this user, you can set up additional users and groups and grant permissions.
Developer: Permissions for download, online change, debugging, and forcing
Service: Backup&Restore the IEC application, update the IEC application (transfer of boot projects), but no programming/debugging of the IEC application
Watch: Read only
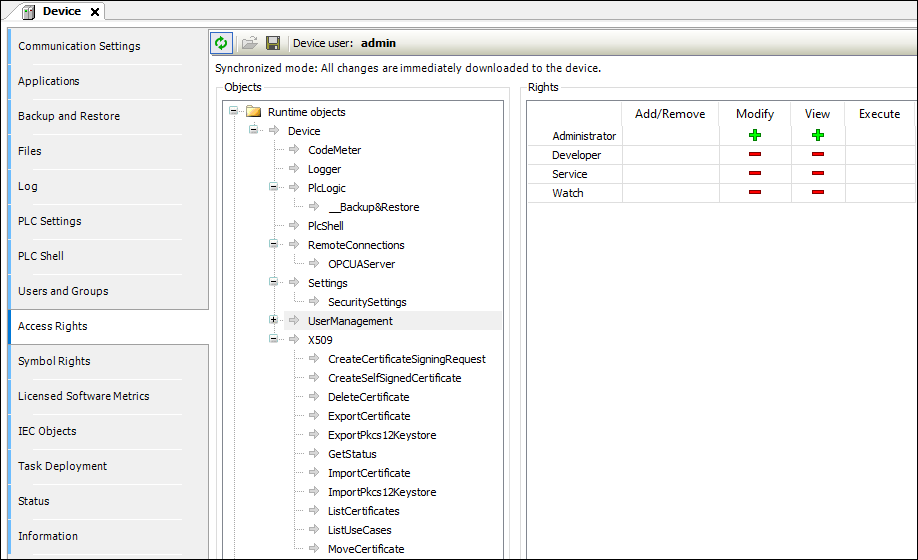
Permissions
Permissions can be granted for the following actions which are executed on the individual objects of the controller:
Add/Remove
Modify
View
Execute
An object on the controller is usually assigned to just one controller component.
Each object can use all of the listed actions, but usually only the permissions for the following actions are needed on an object:
View
Modify
The objects are organized in a tree structure. There are two root objects for the two kinds of objects:
Runtime objects → Device: In these objects, all objects are managed which have online access in the controller and must therefore control the permissions. A object also exists here and below it anAccess Rightsobject, aGroupsobject, and aUsersobject. Below theGroupsobject, there are all defined user groups, to which the permissions for the user groups can then be granted. For more information, see: Overview of the objects.File system objects → /: In these objects, the permissions can be granted to folders of the current execution directory of the controller.
The child objects inherit the permissions from the root object (also Device or "/"). If a permission of a user group is denied or explicitly granted to a parent object, then this affects all child objects.
A single permission can be explicitly granted or denied (green plus sign or red minus sign), or remain "neutral" (light gray character). Neutral means that the permission has been neither explicitly granted nor denied. In this case, the permission of the parent object applies.
If no permission has been explicitly granted or denied in the entire hierarchy of the object, then it is denied by definition. As a result, all permissions are initially denied (exception: the permission for the View action). Initially, this permission is explicitly granted for every user group both on the Device runtime object as well as on the "/" file system object. This allows read access to all objects, unless it is explicitly denied in child objects.
For an overview table for the objects, see: Tab: Access Rights.
See the following instructions for working in the editor for device user management:
Requirement: The connection to the controller is configured. The controller supports a device user management, but one is not active yet.
First set the communication with the controller to "encrypted" so that you do not reveal any credentials to other participants in the network when transferring the user management. This is possible in the device editor on the Communication Settings tab or in the Security screen view. For more information, see: Encrypting Communication with a Certificate and Changing the Security Policy.
In the device tree, double-click the controller object, and in the device editor select the Users and Groups tab. Click the
 button.
A dialog opens prompting whether the device user management should be activated.
Click Yes to confirm the dialog prompt.
The Add Device User dialog opens.
Now create a device user in order to edit the user management as this user. In this case, only the Administrator group is available. Define a Name and Password for the user. The password strength is displayed. Note also the set options regarding a password change. By default, the password can be changed by the user at any time. Use the
 button to store the credentials in the password manager.
Click OK to confirm.
The Device User Logon dialog opens.
Specify a User name and Password for the user who you just defined.
After you click OK to confirm, the device user management is displayed in the editor view. It contains the user of the
Administratorgroup who you just defined. The user name is also displayed in the taskbar of the window as Device User.
Requirement: The controller has a device user management. You have the corresponding credentials.
In the device tree, double-click the controller device object. Select the Users and Groups tab.
Click the
button (Synchronization) to load the user management configuration from the controller to the editor. If you are not logged in to the device yet, then the Device User Logon dialog opens for entering your user name and password. To create a user account for the first login, see the previous instructions.The user management configuration of the device is displayed in the editor.
In the Users view, click Add.
The Add User dialog opens.
Specify the name of the new user and assign the user to a group. This counts as the minimum required "default group" of the user. The user can be assigned to other groups later. Define and confirm a Password for the user. Define whether the user can change the password and whether the user needs to change the password at the first login. Click OK to confirm.
The new user is listed in the Users view as a new node and in the Groups view as a new subentry of the selected default group.
Tip
According to these instructions, new user groups can also be added in the Groups view. A runtime system object is automatically created for each user group and displayed in the Access Rights tab below the UserManagement object. This allows graduated or restricted administrator groups to be set up. For example, a visualization administrator group can be set up which can only add existing users to the visualization user group, but cannot create new users or change the passwords of existing users.
For more information, see: Overview of the objects.
Requirement: The controller has a device user management. You have the corresponding credentials.
In the device tree, double-click the controller device object. Click the Access Rights tab.
Click the
button (Synchronization) to load the permission management configuration from the controller to the editor. If you are not logged in to the device yet, then the Device User Logon dialog opens for entering the credentials.The permissions configuration of the device is displayed in the editor.
On the left in the object tree, select the object whose permission you want to change .
In the Permissions view, a table shows the permissions for this object for all configured user groups.
Double-click the permission in the table that you want to change.
If the object has child objects, then a dialog prompts whether you want to modify the permissions for the child objects.
Click Yes or No to close the prompt.
The permission can be toggled between "explicitly granted" (
 ), "explicitly denied" (
 ), and inherited (
 /
/  ). The symbol in the table cell changes accordingly. Explicitly set permissions are displayed in the table as green or red symbols. Permissions which are inherited from a parent object are displayed as gray symbols.
Tip
In V3.5 SP16 and higher, a file (*.dum2) to be encrypted with a password is used for exporting a user management.
In the device tree, double-click the controller device object.
The device editor opens.
Select the Users and Groups tab.
Click the
 button.
The dialog for selecting a file from the local file system opens.
Select the file (
<file name>.dum2) with the desired user management from the local file system and click Open to confirm.The Enter Password dialog opens.
Specify the password that was assigned when the user management file was exported (possible by means of the
 button).
CAUTION: Importing a device user management by means of a
*.dum2file will completely overwrite the existing user management on the device. In order to log in to the device again afterwards, you need the authentication data from the recently imported user management.When the password is entered correctly, the configuration from the downloaded user management file is now displayed in the editor view.
Edit the configuration however you like. For example, change the user password or add a new user.
Every change is downloaded immediately to the device.
Disabling user management
Important
After disabling the user management, your controller is accessible again for everyone in the network of the controller. Therefore, you should only do this in justified exceptional cases or if the clients used do not support any user management.
Tip
To enable the user management, at least one CODESYS V3.5 SP16 development system is necessary. This means that, in the case of enforced user management which has not been enabled yet, you cannot connect to an older development system.
To reset an enforced, active user management to "Optional", proceed as follows:
In the device tree, double-click the controller. On the Communication Settings tab, click Scan Network and then connect to your controller.
On the Communication Settings tab, select the Device → Change Runtime Security Policy command. Note: The menu is available only as long as you are not logged in to the device.
In the Change Runtime Security Policy dialog, in the Device User Management area, select Optional user management as the New Policy and click OK.
The security policy for device user management is set to "Optional".
Connect to the controller and in the Online menu click the Reset Origin Device command. This deletes the still active user management and configures the setting that the controller should only have an optional user management. Note: In CODESYS V3.5.16.20 and higher, you can exclude the boot application from the delete operation when you execute Reset Origin Device.