Run as WebVisu
Recommendations for data protection
In order to minimize the risk of data security breaches, we recommend the following organizational and technical measures for the system that will run your applications:
Use the newest versions of the gateway server and web server.
Whenever possible, avoid exposing your PLCs and your controller networks to public networks or the Internet.
Configure an HTTPS connection (encryption with SSL/TSL) between the visualization client and the web server.
Use additional data link layers for protection, such as VPN for remote access, and install firewall mechanisms.
Restrict access to authorized people.
Restrict access to the visualization and configure a visualization user management.
At commissioning, change any existing default passwords and change them on a regular basis.
Tip
If you still want to publish your WebVisu, then we strongly recommend that you assign it at least a basic password protection to prevent access to the functionality of your PLC over the Internet.
The web-based display variant of CODESYS Visualization allows for remote access, remote monitoring, as well as service and diagnostics of a plant over the Internet. A web browser communicates with SSL encryption via JavaScript with the web server of the controller and displays the visualization by via HTML5. This technology is supported by almost all browsers and is therefore available on iOS and Android terminals.
Visualizations which are run as CODESYS WebVisu are therefore web applications that are displayed in a browser. The requirement for this is that the runtime system of the controller provides a web server with WebVisu support which takes over the communication between the target system and the web browser. The web server starts automatically as soon as an application is started with a WebVisu configuration (CODESYS WebVisu object). The web server runs until all applications with WebVisu have ended. During this time, a visualization user can monitor and operate the controller in an HTML5-capable web browser in a terminal.
For more information, see the following:
Configuring and starting a display variant
The application-specific settings for the web application are configured in the WebVisu object.
Initial situation: An executable visualization VisuMain with a visualization manager task configuration has been created in the project.
Select the Visualization Manager object.
In the context menu, click the command.
Name the object as
webvisu_appand confirm the settings.The respective editor opens with its default settings.
Configure as follows:
Start visualization:
VisuMainName of .htm file:
webvisu_app
Click Show Used Visualizations.
The Visualizations tab opens. This displays here which visualization object is activated for which variant.
If necessary, activate the visualization for the variant
webvisu_app.The variant is selected for the download.
Open the device editor and configure the communication settings for your controller.
Start your controller with a suitable runtime with a web server and WebVisu support.
Compile, download, and start the application.
The application and the web server are running.
Start a web browser with the following address:
http://localhost:8080/webvisu_app.htmThe web application is displayed. The visualization there is active and you can operate your controller.
Calling the page in a browser
Requirement: A visualization is started with WebVisu.
Start a current browser with JavaScript support and support for HTML5 canvas (for example, Microsoft Edge, Google Chrome, or Mozilla Firefox).
Specify the following address in the web browser:
http://localhost:8080/webvisu.htm
Formal: http://<IP address of the web server>:<port of the web server>/<name of the HTM file>
The <name of the HTM file> is the HTM start page of the visualization defined in the WebVisu object.
The page is displayed and you can see the data of the application and the application is running.
Enabling the web browser with a "HTTP Security" header
The web server in the runtime system which runs the WebVisu can be configured in such a way that additional "HTTP Security" headers are provided. This can be used, for example, to enable additional security features such as X-Frame-Options.
To enable one or more headers, you can configure the necessary settings in the installation directory of CODESYS in the configuration file of the CODESYS Control Win runtime system:
Formal: <installation directory>/GatewayPLC/CODESYSControl.cfg
Specify the settings under the [CmpWebServer] section.
Note
For the web browser (part of the CODESYS Control Win runtime system), a default value is not specified for the "HTTP Security" header. The header is not enabled by default because the functionality depends too much on the environment.
For more information, see the following:
The following code snippet is an excerpt from the CODESYSControl.cfg configuration file. The X-Content-Type-Options header is enabled.
[CmpWebServer]
AdditionalHeader.0.Header="X-Content-Type-Options: nosniff"
AdditionalHeader.0.FileFilter.0="WebVisuV3.bin"
AdditionalHeader.0.ExtensionFilter.0="xml"
AdditionalHeader.0.ExtensionFilter.1="js"
AdditionalHeader.<X>.Headeris always required.AdditionalHeader.<X>.FileFilter.<Y>restrictsAdditionalHeader.<X>.Headerto the specified file name (optional).AdditionalHeader.<X>.ExtensionFilter.<Y>restrictsAdditionalHeader.<X>.Headerto the specified file extension (optional).AdditionalHeader.<X>.Headeris used for all files whenAdditionalHeader.<X>.FileFilterandAdditionalHeader.<X>.ExtensionFilterare not configured.
The X-Content-Type-Options header can be inserted for "WebVisuV3.bin" and all files which end with ".xml" and ".js".
Determining and calling the default page in the web server
Requirements: Multiple executable visualizations are available in the project (visu_main, visu_for_experts). A WebVisu object is configured for each of the visualizations (WebVisu_main, WebVisu_for_experts). The corresponding HTML pages are named webvisu_main and webvisu_for_an_expert.
Double-click the object
WebVisu_main.The WebVisu editor opens.
Select the Use as default page option.
The start page that is specified in the Name of HTM file property is set as the default.
Start a current web browser (on any computer).
Specify only the IP address and the port of the controller in the web browser without the name of the HTML page:
http://localhost:8080Formal:
http://<IP address of web server>:<port of web server>
The default page
webvisu_main.htmopens. You can see the data of the application and the application is running.In the web browser, specify the following address on another device (for example a smartphone):
http://localhost:8080/webvisu_for_an_expert.htm
The specified visualization
webvisu_for_an_expert.htmopens.
Identifying a WebVisu
To be able to identify a WebVisu by means of the library POU VisuFbClientTagDataHelper, the WebVisu needs a name. To be able to address it directly in the application, you extend the URL call with the parameter ClientName=<name>.
Example:
http://localhost:8080/webvisu.htm?ClientName=VisClientxy
Using an encrypted HTTPS connection
Important
Prefer the use of CA-signed certificates.
Note
For a certificate to be considered secure by the browser, it must have been signed by a certification authority. As a rule, every browser has a list of trusted certification authorities. Such a certificate can be checked by the browser itself so that no warning message appears in the browser when a secure connection is established. Signing a certificate from one of these trusted certification authorities is not usually free of charge.
Alternatively, you could also use a certificate you have created yourself. The disadvantage is that this certificate has to be checked in the browser. The browser issues a warning that the connection is not trusted. You can then add an exception so that this warning does not appear every time this connection is opened. However, to make sure that communication is actually taking place with the correct controller, it is necessary to compare the signature value of the certificate with the signature value of the certificate on your own controller.
A certificate is required to establish a secure connection between your browser and the web server via an HTTPS connection. It is advisable to use the CODESYS Security Agent to install a valid control certificate for encrypted communication.
Click the View → Store command and sign in.
Search for the CODESYS Security Agent and start the download.
The package is installed and is listed in Installed Packages.
Exit the dialog.
Configure the communication settings and the gateway for your device.
Click the command and select the Devices tab.
Click the
 symbol there.
The view notifies you about installed certificates for the devices found in the network and provides command icons for certificate handling.
In the left information list, select the device to which you want to establish a secure connection.
Depending on the connection channel, the right information list shows the certificates that are available on this device. For example, certificates can exist for the OPC UA Server, Encrypted Communication, Encrypted Application, and Web Server communication channels. Disabled (grayed out) channels that are marked as (not available) do not have a certificate.
In this information list, select the Web Server channel and click the
 symbol on the left.
A dialog opens for certificate settings.
Set the key length (example: 3072) and the validity period (example: 365 days). Click OK to close the dialog.
Note: The validity period should be as short as possible for security reasons. However, the constant updating of the certificate is time-consuming. If you need the certificate for a longer period of time, then you should balance carefully between security and convenience (rare certificate updates).
Now a certificate is created for the web server. When the operation is completed, the certificate data is displayed on the tab.
Then restart your device together with the runtime.
Download the application with the visualization for the CODESYS WebVisu to this device.
Your device is ready for a secure connection.
Check the configuration of the web server in your CODESYS runtime system CODESYS Control Win as described in the following steps.
For more information, see the following: CODESYS Control Win V3
Is HTTPS enabled on the web server?
[CmpWebServer]
ConnectionType=3
Possible values:
HTTP_ONLY, /* = 0 */HTTPS_ONLY, /* = 1 */HTTP_AND_HTTPS, /* = 2 */REDIRECT_HTTP_TO_HTTPS /* = 3 */Alternative
In CODESYS, open the device editor and then switch to the Communication Settings tab.
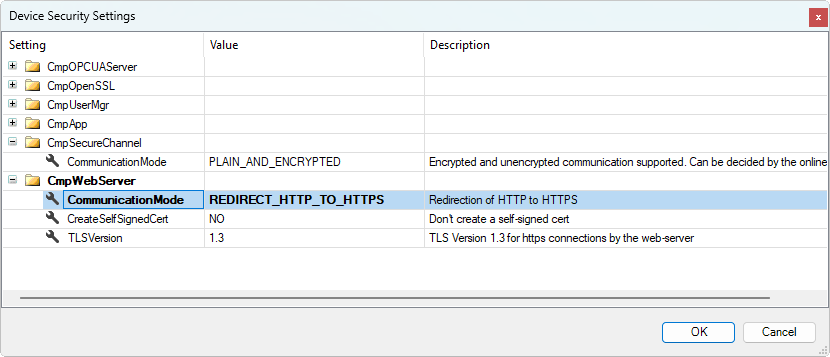
In der menu bar above, select the Device → Device Security Settings command. The Device Security Settings dialog will open. There you can adapt the configuration under the Value column.
In the
CmpWebServerarea of the settings for the web server, you will find theCommunicationModesetting. Here you can edit the desired communication mode.If necessary, set the value of
CommunicationModetoREDIRECT_HTTP_TO_HTTPSand then click OK to apply the values on the device.Dialog: Device Security Settings

If port 443 is already in use, then it can be changed to a different value.
[CmpWebServer]
WebServerSecurePortNr=443 // HTTPS
Possible value:
WebServerPortNr=9090 // HTTPAre the web server settings stored in the log file as expected?

Open your browser and specify the URL address of your web server (example:
https://<host name of controller>:443/webvisu.htm).The URL has the format: https://<host name of controller>/URL>:443/<name of HTM file>.htm.
The HTML file name has to match the name in the configuration in the Visualization Manager in the WebVisu object. You get the IP address from your device configuration.
The browser establishes a connection. If the certificate is not trusted, then a security notice appears.
Check the certificate information. If it is correct, then confirm that you understand the risk and want to continue.
You have created a self-signed certificate. Its validity can be validated, for example by the Thumbprint by displaying the thumbprint in the browser and then comparing with the value from the Security Agent.
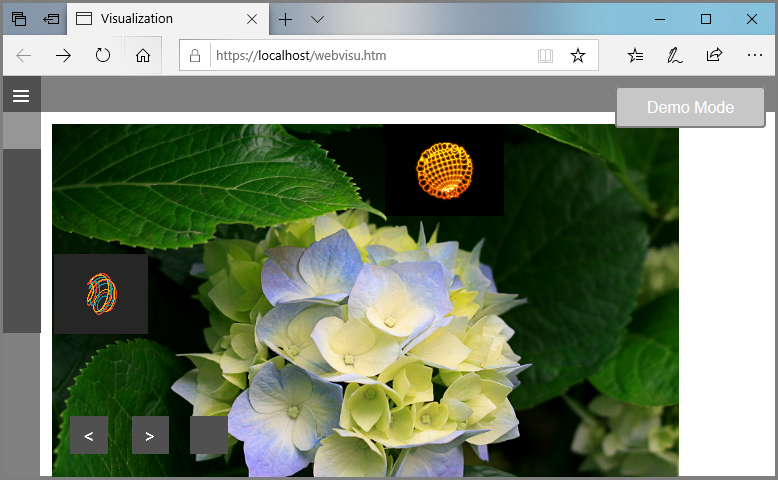
Now the WebVisu page starts. The lock symbol in the browser indicates secure communication.

Important
BeagleBone Black
If you use a BeagleBone Black as a visualization device, then you need to note that a BeagleBone Black uses port 9090 for its web server. A valid URL would then be:
http://192.168.7.2:9090/webvisu.htm