Configuring Text Input
Visualizations support input via mouse/gestures or keyboard, as well as virtual keyboards for touch devices.

The virtual keyboards in CODESYS provide different functionalities. Which keyboard should actually be used is selected by using the input type. This input type is configured application-wide in the Visualization Manager. When programming the user input for a visualization, a specific input type can be selected.
The input type is configured in the following places:
In the Visualization Manager, you can preset a keyboard visualization under the Settings for Default Text Input group. This is then called up by all visualizations in the application as needed. This works without having to customize the user inputs of the visualizations.
In the individual visualization elements which respond to user input, you can configure the Input configuration property with the input action Write Variable. From the various virtual keyboards, choose the one that has the desired range of functions.
For more information, see the following:
Help page for Dialog Settings
Help page for input action Write Variable and the possible input types
Virtual keyboards
Input type | Virtual keyboard |
|---|---|
|  The size and position can be changed. |
| 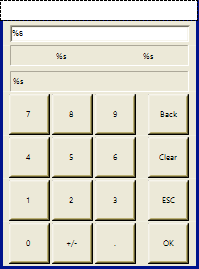 |
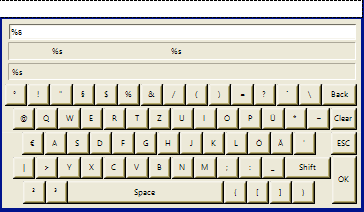
| The keyboard is language-specific in terms of the layout and function of the keys. It is prepared for the languages German, English (en-US), and French. A language change is possible. If a physical keyboard is also available, then input can be made from there as well. The virtual keyboard is suitable for entering numerical values. During input, compliance with the expected data type (integer, floating-point number, time, or date/time) is checked. The size and position can be changed. |
|  |
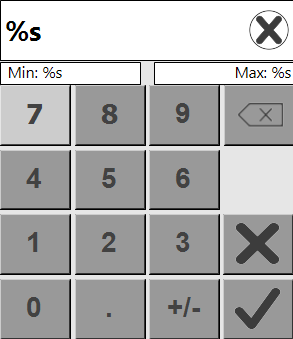
| Extended numeric keypad, also for entering hexadecimal numbers |
| The dialog works the same as The size and position can be changed. |
| Input of values within a range of numbers |
Tip
With the compiler define VISU_DIALOGS_NO_GENERAL_AUTO_SIZE_UPDATE, changes to dialog position and size by different scaling can generally be disabled.
Programmatic options
The virtual keyboards VisuDialogs.*2 can be changed programmatically.
Tip
To make sure that settings are retained even during online changes, it is advisable to configure them in the Visualization Manager using the functionality "Call after visu initialization".
Programmatic options
To programmatically change the default layout or to extend your own layouts, you can use the variable
Dialog_Variables.g_ptLanguageSpecificSettings.To configure the switch time of the extended keyboard characters, you can use the variable
VisuDialogs.Dialog_Variables.g_DialogSettings.tKeyboardCharSwitchTime.To disable the "Clear Text" button, you can use the variable
Dialog_Variables.g_DialogSettings.xDisableClearTextButton.To disable the password visibility, you can use the variable
Dialog_Variables.g_DialogSettings.xDisablePasswordVisibilityButton.The time of day in time dialogs can be specified in 12-hour format (e.g.,
3:00 PM) or in 24-hour format (e.g.15:00). By default, the format depends on the language setting of the client.You can use the variable
Dialog_Variables.g_ptLanguageSpecificSettingsto change the format.If you want to define more different language settings, you can declare and assign your own array of type
VisuDlg_LanguageSpecificSetting.
Configuring text input via the standard procedure
Configuration via Input type = Default
When UTF-8 encoding is enabled for the STRING data type, texts with language-specific characters are allowed. Texts with language-specific characters, such as diacritic characters or Chinese characters, can then be specified both during input and output. You can enable UTF-8 encoding in Dialog: Project Settings: Compile options.
Requirement: A project with a visualization is open. The CODESYS TargetVisu does not have a keyboard.
Declare an input variable in the
PLC_PRGprogram.Declaration
VAR_INPUT
    stInput : STRING;
END_VAR
Add a button to the visualization and select the element.
Configure the property with
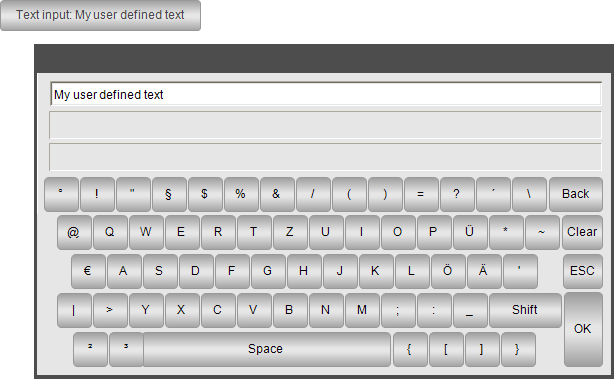
Text input: %s.Configure the property with
PLC_PRG.stInput.In the property, click Configure.
The Input Configuration dialog opens. The selected input event is displayed below the caption.
Select the Write Variable action.
Select the value
Standardin Input type of the implementation of the action.The input is configured as usual.
Compile, download, and start the application as CODESYS TargetVisu.
The visualization opens.
As a visualization user, click the button.
An input field is displayed with a virtual keyboard which allows text input by means of the mouse.
Compile, download, and start the application as CODESYS WebVisu.
The visualization opens.
As a visualization user, click the button.
An input field is displayed and prompts for text input.
Configuring text input especially for the virtual keyboard VisuDialogs.Keypad
Requirement: A project with a visualization is open.
Declare an input variable in the
PLC_PRGprogram.Declaration
VAR_INPUT
    stInput : STRING;
END_VAR
Add a button to the visualization and select the element.
Configure the property with
Text input: %s.Configure the property with
PLC_PRG.stInput.In the property, click Configure.
The Input Configuration dialog opens. The selected input event is displayed below the caption.
Select the Write Variable action.
Select the visualization
Visudialogs.Keypadin Input type of the implementation of the action.The virtual keyboard
Visudialogs.Keypadis selected as the input device.Compile, download, and start the application.
The visualization opens.
As a visualization user, click the button.
The virtual keyboard is displayed and allows text input by means of the mouse.
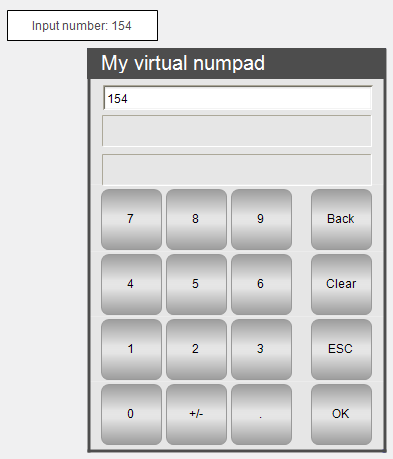
Configuring numeric input especially for virtual numeric keypads
Requirement: A project with a visualization is open.
Declare an input variable in the
PLC_PRGprogram.Declaration
VAR_INPUT
    iInput : INT;
END_VAR
Open the visualization and add a Rectangle element.
Select the element in the editor.
The properties are visible in the Properties view.
Configure the property with
Number input: %i.Configure the property with
PLC_PRG.iInput.In the Input configuration property, click the Configure button in the
OnMouseClickline.The Input Configuration dialog opens. The selected input event is displayed below the caption.
There you select the
Write Variableaction from the list of possible actions and click the symbol.
The action is displayed in the list of actions to be executed. The blank implementation of the action is displayed in the window area to the right of the list.
Select the following settings:
Input type set to
VisuDialogs.Numpad.Choose variable to edit set to Use text output variable.
Dialog title set to
'My virtual numpad'.Click OK to close the dialog.
The user input is configured.
Compile, download, and start the application.
The application runs. The visualization opens. When a user clicks the rectangle, the numeric keypad opens.
Defining default text input
Requirement: A project with a visualization and a user input configuration is open. For all Write Variable follow-up actions, the value Default is selected for the Input type setting.
Double-click the Visualization Manager.
On the Settings tab, in the Default Text Input group, click in the default text input to assign visualizations.
These visualizations are defined as default text input. If a display variant does not have a keyboard, then these visualizations are called without you having to adapt the user input.