Managing Languages and Translations
Adding a language and translating text
Requirement: A project is open with a text list or global text.
In the device tree or POU view, double-click an object of type TextList or GlobalTextList.
The Text List menu is shown in the menu bar and the text list opens in the editor.
Click .
Specify a name for the language (example:
en-US). Click OK to exit the dialog.A column is displayed with the heading
en-US.Type in the translation of the source text into the column.
Tip
You can use the Rename Language command in the context menu of the text list to correct the name of a language in the table.
Exporting a text list
Requirement: A project is open with a text list or global text.
Double-click the GlobalTextList object or a TextList object type.
The object opens.
Click .
The Import/Export dialog opens.
At Choose export file, click
 and select the directory and file name.
Example:
Text_lists_exportedSelect the Export option.
Click OK to close the Import/Export dialog.
CODESYS exports to a file the text list entries of all text lists of the project. The table contains a column with the text list names.
Contents of the Text_lists_exported file
TextList        Id      Default en_US
Text_list_A     A       Information A   Infrrmaiton A_en
Text_list_A     B       Information B: OK       Information B_en: OK
Text_list_A     C       Information C   Information C_en
Text_list_A     D       Informaiton D   Information D_en
Text_list_A     E       Information E   Infromation E_en
Text_list_A     F       Information F   Information F_en
AlarmGroup      2       Warnung 2
AlarmGroup      1       Warnung 1
GlobalTextList          Infomation B    Information B_en
GlobalTextList          Information A   Information A_en
GlobalTextList          Umschalten      Switch
GlobalTextList          Zähler: %i      Counter : %i
Preparing the Exported File for the Input Assistant
Requirement: A file is created (example: Text_lists_exported) by means of the Import/Export Text Lists command. It contains the texts of the text lists of the project.
Click , Visualization category, File Options tab.
In Text file for textual "List components", click
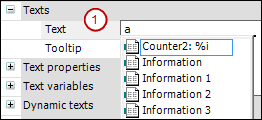
and select a file (example: Text_lists_exported). Click OK to exit the dialog.When you specify a static text in the Texts property (1) for an element in a visualization, CODESYS offers the source text of the file as input assistance when typing in the first letter.
Importing files with text list entries
A file to be imported has the .csv format. The first line is a header (example: TextList Id Default en_US). The other lines contain text list entries. You get this kind of file by exporting the text lists of the project to a file. There you can edit the text list entries and then import the file outside of CODESYS. When importing, CODESYS handles the text list entries differently for the GlobalTextList and for dynamic text lists.
GlobalTextListCODESYS does not create new text list entries for an unknown ID.
CODESYS ignores changes that affect the ID or the source text.
CODESYS accepts changes in the translations.
Text List
For a new ID, CODESYS supplements the corresponding text list with a text list entry.
For an existing ID which does not match in the source text, the source text of the text list is overwritten with the source text of the file.
CODESYS accepts changes in the translations.
Requirement: A project is open with a text list or global text.
Double-click the GlobalTextList object or a TextList object type.
The object opens.
Click .
The Import/Export dialog opens.
In the Choose file to compare or to import input field, click
and select the directory and file.Example:
Text_lists_corrected.csvSelect the Import option.
Click OK to exit the dialog.
CODESYS imports the text list entries of the file into the respective text lists.
Contents of the file Text_lists_corrected.csv
TextList        Id      Default en_US
Text_list_A     A       Information A   Information A2_en
Text_list_A     B       Information B: OK       Information B_en: OK
Text_list_A     C       Information C   Information C_en
Text_list_A     D       Information D   Information D_en
Text_list_A     E       Information E   Information E_en
Text_list_A     F       Information F   Information F_en
Text_list_A     G       Information G   Information G_en
AlarmGroup      2       Warnung 2
AlarmGroup      1       Warnung 1
GlobalTextList          Information B   Information B_en
GlobalTextList          Information A   Information A_en
GlobalTextList          Umschalten      Switch
GlobalTextList          Zähler: %i      Counter : %i
These contents are applied to the text lists with the same name in the project.
For more information, see: Import/Export Text Lists
Comparing text lists with a file and exporting differences
Requirement: A project is open with a text list or global text.
Double-click the GlobalTextList object or a TextList object type.
The object opens.
In the context menu, click .
The Import/Export dialog opens.
In the Choose file to compare or to import input field, click
and select the directory and file name of the comparison file (example: Text_lists_corrected.csv).For Choose export file, click
and select the directory and file which contains the comparison result.Select the Export only text differences option.
Click OK to exit the dialog.
CODESYS reads the import file and compares the text list entries that have the same ID. If they do not match, then CODESYS writes the text list entries of the text list to the export file.
For the global text list, CODESYS compares the translations of the same source texts. If they do not match, then CODESYS writes the text list entries to the export file.