Using Scripts to Access CODESYS Functionalities
All objects and command which CODESYS provides for scripting are also available in the "scriptengine" Python module. Whenever a script is started, an implicit <code>from scriptengine import *</code> results. This allows for easy access to CODESYS. However, if your script imports modules that require access CODESYS APIs, then these modules have to import the module scriptengine themselves.
In the following table, you will find the main objects (categories) that can be used in Python scripts as entry points. For comprehensive documentation about entry points, see the API reference documentation for the CODESYS ScriptEngine: CODESYS Scripting API.
Objects | Description |
|---|---|
system | Access to general CODESYS functionalities Examples:
|
projects | Access to the CODESYS project as an object tree that combines the three navigator views (devices, POUs, modules) in one project tree Also allows for the loading, creating, saving, and closing of projects For most objects in a project, there are special methods with detailed functionality, for example compiling, access to ST POUs, export, import, device configuration, etc. |
online | Access to online functionalities Examples:
|
librarymanager | Allows the management of library repositories and viewing, installation, and removal of libraries |
device_repository | Handling of device repositories; import and export of device descriptions |
modulerepository | Management of CODESYS Application Composer modules and CODESYS Application Composer repositories |
See the following specific sample scripts for ways to access CODESYS functionalities. For detailed information, see the API reference documentation for the CODESYS ScriptEngine: CODESYS Scripting API.
Example: Printing the device tree of the current project
The script PrintDeviceTree.py is an example for navigating in a project. It creates the output of a hierarchical display of all devices in the open project.
Load a project that contains some device objects and execute the script.
PrintDeviceTree.py# encoding:utf-8
# We enable the new python 3 print syntax
from __future__ import print_function
# Prints out all devices in the currently open project.
print("--- Printing the devices of the project: ---")
# Define the printing function. This function starts with the
# so called "docstring" which is the recommended way to document
# functions in python.
def print_tree(treeobj, depth=0):
""" Print a device and all its children
Arguments:
treeobj -- the object to print
depth -- The current depth within the tree (default 0).
The argument 'depth' is used by recursive call and
should not be supplied by the user.
"""
# if the current object is a device, we print the name and device identification.
if treeobj.is_device:
name = treeobj.get_name(False)
deviceid = treeobj.get_device_identification()
print("{0}- {1} {2}".format("--"*depth, name, deviceid))
# we recursively call the print_tree function for the child objects.
for child in treeobj.get_children(False):
print_tree(child, depth+1)
# We iterate over all top level objects and call the print_tree function for them.
for obj in projects.primary.get_children():
print_tree(obj)
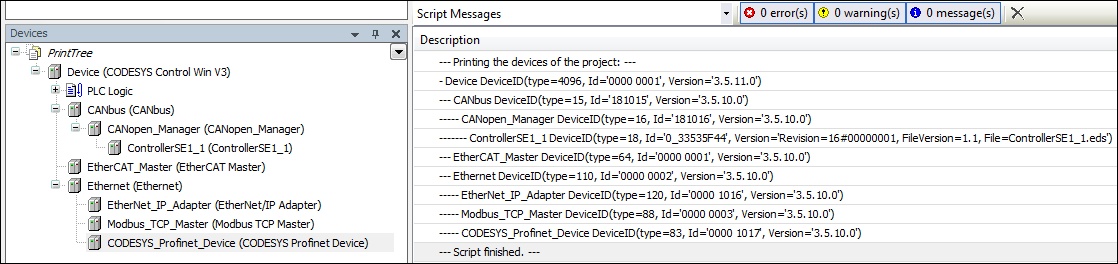
print("--- Script finished. ---")The device tree (from the "Devices" view) is displayed in the message view and all non-device objects are left out:
Example: Reading of variables
The script ReadVariable.py logs in to the device and starts the application if necessary. Then the value of the variable PLC_PRG.iVar1 is read and output. To try the script, you need to modify the project path and variable names.
ReadVariable.py# encoding:utf-8
from __future__ import print_function
# close open project if necessary:
if projects.primary:
projects.primary.close()
# opens project
proj = projects.open(r"D:\data\projects\Ampel.project")
# set "Ampel.project" to active application
app = proj.active_application
onlineapp = online.create_online_application(app)
# login to device
onlineapp.login(OnlineChangeOption.Try, True)
# set status of application to "run", if not in "run"
if not onlineapp.application_state == ApplicationState.run:
onlineapp.start()
# wait 1 second
system.delay(1000)
# read value of iVar1
value = onlineapp.read_value("PLC_PRG.iVar1")
# display value in message view or command line
print(value)
# log out from device and close "Ampel.project"
onlineapp.logout()
proj.close()In the extension of the script ReadVariable.py, the script MailVariables.py loads variables and expressions from a recipe file and reads their current values from the controller. Then these values are written back to the same file. In addition, it uses the Python SMTP library to send an email with an attachment containing a list of all variables.
To use the script, you need to modify the paths, email address, and the name of the SMTP server to your environment.
MailVariables.py# encoding:utf-8
from __future__ import print_function
# Close current project if necessary and open "ScriptTest.project"
if not projects.primary == None:
projects.primary.close()
project = projects.open("D:\\Data\\projects\\scriptTest.project")
# retrieve active application
application = project.active_application
# create online application
online_application = online.create_online_application(application)
# login to application.
online_application.login(OnlineChangeOption.Try, True)
# start PLC if necessary
if not online_application.application_state == ApplicationState.run:
online_application.start()
# wait 2 seconds
system.delay(2000)
# open recipe file to read values.
recipe_input_file = open("D:\\Data\\projects\\RecipeInput.txt", "r")
watch_expressions = []
for watch_expression in recipe_input_file:
watch_expressions.append(watch_expression.strip())
print watch_expressions
# read values from the controllerd
watch_values = online_application.read_values(watch_expressions)
print watch_values
# open output file to write values
recipe_output_file = open("D:\\Data\\projects\\RecipeOutput.txt", "w")
for i in range(len(watch_expressions)):
recipe_output_file.write(watch_expressions[i])
recipe_output_file.write(" = ")
recipe_output_file.write(watch_values[i])
recipe_output_file.write("\n")
# Close files
recipe_input_file.close()
recipe_output_file.close()
# send Email
# import respective libraries
import smtplib
from email.mime.text import MIMEText
#open output file
recipe_output_file = open("D:\\Data\\projects\\RecipeOutput.txt", "r")
mail = MIMEText(recipe_output_file.read())
recipe_output_file.close()
#email address sender and recipient
fromm = "info@example.com"
to = "info@example.com"
# set sender and recipient
mail["Subject"] = "Attention value has changed"
mail["From"] = fromm
mail["To"] = to
# send email
smtp = smtplib.SMTP("name of smtp server")
smtp.sendmail(fromm, [to], mail.as_string())
smtp.quit()
# logout and close application
online_application.logout()
project.close()Example: Creating and editing of POUs
The script CreateDut.py creates the objects MyStruct, MyAlias, and MyUnion in the CODESYS project. The folder DataTypes already has to be present.
CreateDut.py# encoding:utf-8
from __future__ import print_function
STRUCT_CONTENT = """\
a : BOOL;
b : BIT;
c : BIT;
"""
UNION_WHOLE = """\
TYPE MyUnion :
UNION
Zahl : INT;
Prozent : MyAlias;
Bits : MyStruct;
END_UNION
END_TYPE
"""
proj = projects.primary
folder = proj.find('DataTypes', recursive = True)[0]
# Create a struct DUT and insert the list of variables just into the right
# place in line two, row 0 (line numbering starts with line 0)
struktur = folder.create_dut('MyStruct') # DutType.Structure is the default
struktur.textual_declaration.insert(2, 0, STRUCT_CONTENT)
# Alias types get their "content" via the base type, which will just end up
# as one line in the declaration part:
# TYPE MyAlias : INT (0..100); END_TYPE
bereich = folder.create_dut('MyAlias', DutType.Alias, "INT (0..100)")
# Instead of injecting the variables into the existing declaration,
# one can also just replace the complete declaration part, including the
# boilerplate code.
union = folder.create_dut('MyUnion', DutType.Union)
union.textual_declaration.replace(UNION_WHOLE)Example: User interface / Interaction with the user
In some cases, scripts have to interact with the user. We provide some simple APIs for the most common interactions. The sample script System_UI_Test.py shows all of the possible functions in this regard.
System_UI_Test.py# encoding:utf-8
from __future__ import print_function
"""Performs some tests on the messagestore and UI."""
print("Some Error, Warning and Information popups:")
system.ui.error("Fatal error: Everything is OK. :-)")
system.ui.warning("Your bank account is surprisingly low")
system.ui.info("Just for your information: 42")
print("Now, we ask the user something.")
res = system.ui.prompt("Do you like this?", PromptChoice.YesNo, PromptResult.Yes);
print("The user selected '%s'" % res)
print("Now, the user can choose between custom options:")
res = system.ui.choose("Please choose:", ("First", 2, 7.5, "Something else"))
print("The user selected option '%s'" % str(res)) # res is a tuple
print("Now, the user can choose several options:")
res = system.ui.select_many("Please select one or more options", PromptChoice.OKCancel, PromptResult.OK, ("La Premiere", "The Second", "Das Dritte"))
print("The returned result is: '%s'" % str(res)) # res is a tuple
print("Now, the user can select files and directories")
res = system.ui.open_file_dialog("Choose multiple files:", filter="Text files (*.txt)|*.txt|Image Files(*.BMP;*.JPG;*.GIF)|*.BMP;*.JPG;*.GIF|All files (*.*)|*.*", filter_index = 0, multiselect=True)
print("The user did choose: '%s'" % str(res)) # res is a tuple as multiselect is true.
res = system.ui.save_file_dialog("Choose a file to save:", filter="Text files (*.txt)|*.txt|Image Files(*.BMP;*.JPG;*.GIF)|*.BMP;*.JPG;*.GIF|All files (*.*)|*.*", filter_index = 0)
print("The user did choose: '%s'" % res)
res = system.ui.browse_directory_dialog("Choose a directory", path="C:\\")
print("The user did choose: '%s'" % res)
print("Now we query a single line string")
res = system.ui.query_string("What's your name?")
print("Nice to meet you, dear %s." % res)
print("Now we query a multi line string")
res = system.ui.query_string("Please tell me a nice story about your life!", multi_line=True)
if (res):
print("Huh, that has been a long text, at least %s characters!" % len(res))
else:
print("Hey, don't be lazy!")
Example: Manipulating the Project Information object
In the script ProjectInfoExample.py, we set some information in the Project Information object. The most important information items, such as Title and Version, have explicit properties. However, you can read and write any other information fields by means of the dictionary syntax. For example, those that are recommended for the properties of a library project.
The example below may seem somewhat unrealistic, but similar code is used in build servers that create, test, and possibly release automatic library projects and other projects. The ScriptEngine is one of the key elements for creating CI (Continuous Integration) and CD (Continuous Delivery) systems.
ProjectInfoExample.py# encoding:utf-8
from __future__ import print_function
proj = projects.load("D:\Some.library")
info = proj.get_project_info()
# Set some values
info.company = "Test Library Ltd"
info.title = "Script Test Project"
info.version = (0, 8, 15, 4711)
info.default_namespace = "testlibrary"
info.author = "Python von Scriptinger"
# some values recommended in the library toolchain
info.values["DefaultNamespace"] = "testlibrary"
info.values["Placeholder"] = "testlibrary"
info.values["DocFormat"] = "reStructuredText"
# now we set a custom / vendor specific value.
info.values["SpecialDeviceId"] = "PLC0815_4711"
# Enable generation of Accessor functions, so the IEC
# application can display the version in an info screen.
info.change_accessor_generation(True)
# And set the library to released
info.released = True;
proj.save()Example: Calling external commands and importing PLCopenXML files
The sample script DeviceImportFromSVN.py gets a PLCopenXML file from an external program (in this case a SVN client) and imports it into a new created CODESYS project.
To use the script, you need to modify the paths to your environment.
DeviceImportFromSVN.py# encoding:utf-8
# Imports a Device in PLCopenXML from Subversion via command line svn client.
# We enable the new python 3 print syntax
from __future__ import print_function
import sys, os
# some variable definitions:
SVNEXE = r"C:\Program Files\Subversion\bin\svn.exe"
XMLURL = "file:///D:/testrepo/testfolder/TestExport.xml"
PROJECT = r"D:\test.project"
# clean up any open project:
if projects.primary:
projects.primary.close()
# Fetch the plcopenxml data from subversion.
# We'll catch the output of the program into the xmldata variable.
# The 'with' construct automatically closes the open pipe for us.
with os.popen('"' + SVNEXE + '" cat ' + XMLURL, 'r') as pipe:
xmldata = pipe.read()
# create a new project:
proj = projects.create(PROJECT)
# import the data into the project.
proj.import_xml(xmldata, False)
# and finally save. :-)
proj.save()
print("--- Script finished. ---")Examples: Project archiving
The functions open_archive() and save_archive() are scripting functions for extracting a project archive or saving a project as a project archive. For both functions, ArchiveCategories can be specified.
For this,
open_archive()accepts the parametercategories_to_extract.save_archive()accepts the parameteradditional_categories.
ArchiveCategories are project archive categories which are extracted with the project archive in the case of open_archive() or archived with the project archive in the case of save_archive().
Examples: open_archive()
Various examples of open_archive() with the parameter categories_to_extract are presented below:
Default behavior: categories_to_extract=None
If categories_to_extract are not explicitly specified, then the parameter is set to None. All categories are pulled and extracted from the project archive.
# Default
projects.open_archive(stArchiveFile=r"D:\Tests\Test.projectarchive", stProjectPath=r"D:\Tests", bOverwrite=True)
Empty list: categories_to_extract=[]
If the parameter categories_to_extract is explicitly specified with an empty list, then no categories are pulled from the project archive.
# Passing empty list
projects.open_archive(stArchiveFile=r"D:\Tests\Test.projectarchive", stProjectPath=r"D:\Tests", bOverwrite=True, categories_to_extract=[])
Multiple categories
Multiple categories can be specified in the parameter categories_to_extract. Only the specified categories are also extracted.
# Multiple categories
projects.open_archive(stArchiveFile=r"D:\Tests\Test.projectarchive", stProjectPath=r"D:\Tests", bOverwrite=True, categories_to_extract=[ArchiveCategories.libraries, ArchiveCategories.devices])
Possible errors
If categories are specified in categories_to_extract which do not exist in the current CODESYS installation, then an error message is displayed. The project archive cannot be extracted until the missing category is installed or the category is removed from the parameter in the script.
Examples: save_archive()
Various examples of save_archive() with the parameter additional_categories are presented below:
Default behavior
If additional_categories are not explicitly set, then the default categories of the CODESYS interface are also archived.
No categories: additional_categories=None
If additional_categories is explicitly set to None in the script, then no categories will be archived.
Multiple categories
Multiple categories can be specified in the parameter additional_categories. Only the specified categories will be included in the archive.
# Muliple categories
projects.save_archive(path=r"D:\Tests", comment="A new project", additional_files=[], additional_categories=[ArchiveCategories.libraries, ArchiveCategories.devices])
Advanced example: Calling a library from SVN and installing it in CODESYS
The following sample script can perform the calling and installing of a library as part of a CT (Continuous Testing) environment so that they can be tested. In addition to standard-CODESYS, the CODESYS SVN add-on also has to be installed with a valid license.
import tempfile

if projects.primary:
    projects.primary.close()

tempdir = tempfile.mkdtemp()
URL = "svn://localhost/testrepo/trunk/SvnTestLibrary/"

proj = svn.checkout(URL, tempdir, "testlibrary", as_library=True)
proj.save()

repo = librarymanager.repositories[0]
librarymanager.install_library(proj.path, repo, True)

proj.close()