Example: First Steps
Product: CODESYS Application Composer
This example shows how to get started with creating and using modules for the CODESYS Application Composer. For this purpose, you will create a room with lights and switches.
Description
In the example, a short scenario from building automation is implemented: equip a room with lights and corresponding switches. The switches can also be used as dimmers. Therefore, the lights should also support different brightness levels.
Preparatory work
Create a new CODESYS project from the Standard project with Application Composer template. Select
AC_ModuleBaseas the library.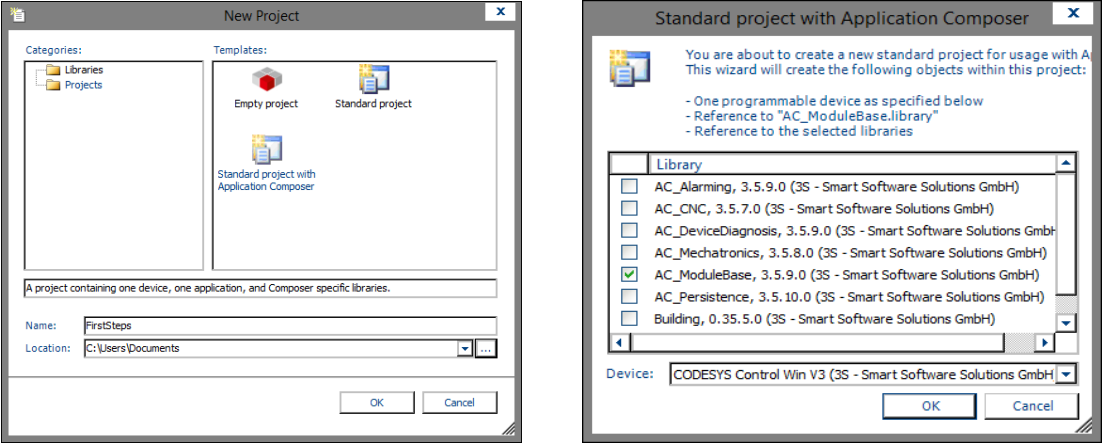
The top-level module
RoomAdd a new module declaration to the POU pool of the project. Assign the name
Roomto the module declaration and the associated function block. The function block must also extend theAC.Modulefunction block which is defined in theAC_ModuleBaselibrary. TheAC.Modulefunction block already provides numerous methods and properties which do not have to be overwritten.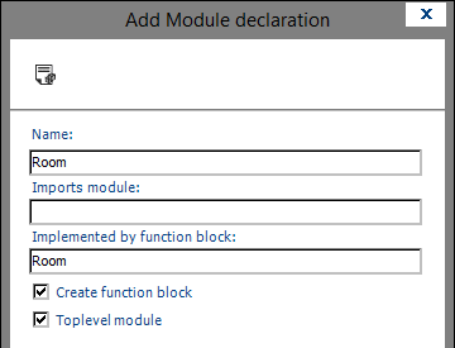
The declaration starts with the keyword
MODULEfollowed by the module name and the additional keywordIMPLEMENTED_BY, as well as by the function block which implements the module. Specifically, this function block is theRoomfunction block which has just been created. In most cases, theMetaDatasection is declared now.For detailed information about all parameters and sections, see: Module editor.
Because the
Roommodule is the top-level module in our example, you declare theToplevelsection next. In this section, you define a name for the global variable list which contains the instance name of the top-level function block after being generated. After that, you still need to define at least one more task in theToplevelsection. This task isStandard_Taskin this example. It is defined as aMEDIUMtask and contains theCREATE_IF_MISSINGandUPDATE_IOSflags.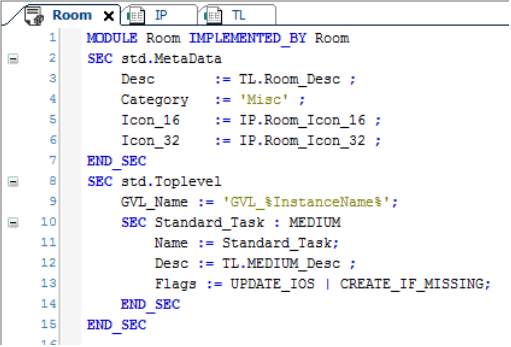
All icons and strings which are used as placeholders for the descriptions and icons (
Desc,Icon_16, andIcon_32parameters) must be referenced in text lists and image pools. Because of this, you create a corresponding text listTLand an image poolIPin the POU pool which contains the referenced icons and texts.Submodule:
SwitchCreate a module declaration and a corresponding function block named
Switch. This module is not a top-level module and therefore does not require aToplevelsection. Like all function blocks that represent modules, theSwitchfunction block must also extendAC.modules. Moreover,Switchimplements theISwitchinterface which you also need to create. In turn, theISwitchinterface extendsAC.IModulebut does not add any new methods or properties to it.Furthermore, the switch requires an input signal in order to recognize when it is pressed. You declare this signal in the
IOsection, using thexIninput variable of theSwitchfunction block. Furthermore, you need a reference time to distinguish the two functions of the switch: Pressing the switch for the time durationtTimerstarts the dimming function – a shorter press only switches the light on or off. You define the input variabletTimeras a parameter of the module (Parameterssection). In this way, you can easily set the time later when using the modules.You define the variables
xInandtTimeras inputs of theSwitchfunction block, where you set an initial value of 500ms for thetTimerparameter.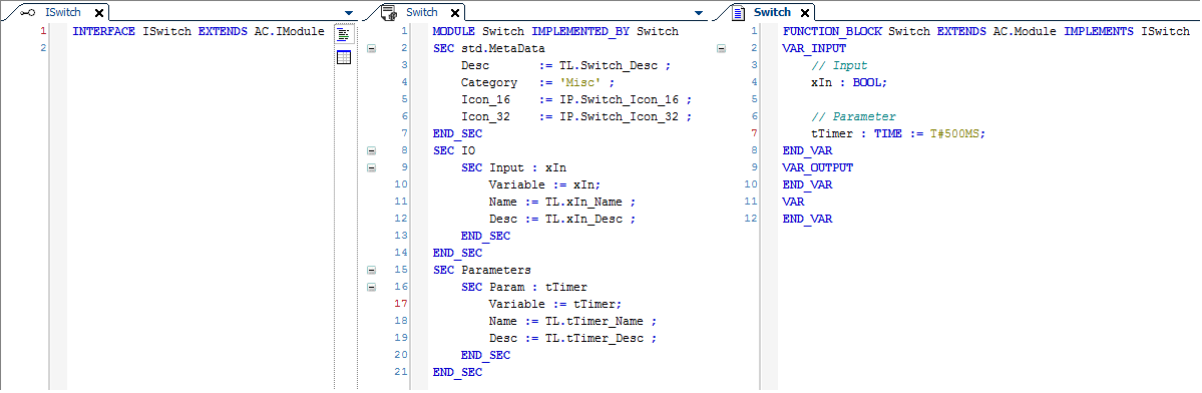
You also need to extend the text list and image pool in oder to display the descriptions.
Submodule:
SwitchSimpleThe second switch module which you create is a simple switch with only two states: on and off. To do this, you need to create a module declaration and a function block which differ from the existing switch only in the following points: the parameter and the
tTimervariable are not required. In addition, you do not implementISwitchbutISwitchSimple, which also extendsAC.IModule.
Submodule:
LightAs before for the switches, for the light you also need to create a module declaration
Lightwith theLightfunction block andILightinterface.To insert the
Lightmodule below a room, you need to add theSlotssection to theLightmodule declaration. In this section, you declare a subsectionSlot_Multi, which you callLightsand which can hold the modules of typeILight. The number of lights that must or can be added to a room is specified byCardinality. You also define the variablesVariableandVar_Countand link these to the module declarationpLights(POINTER TO ILight)anduiNumberOfLights (UINT). This makes sure that only modules whose function blocks implement theILightinterface can be added to theLightsslot.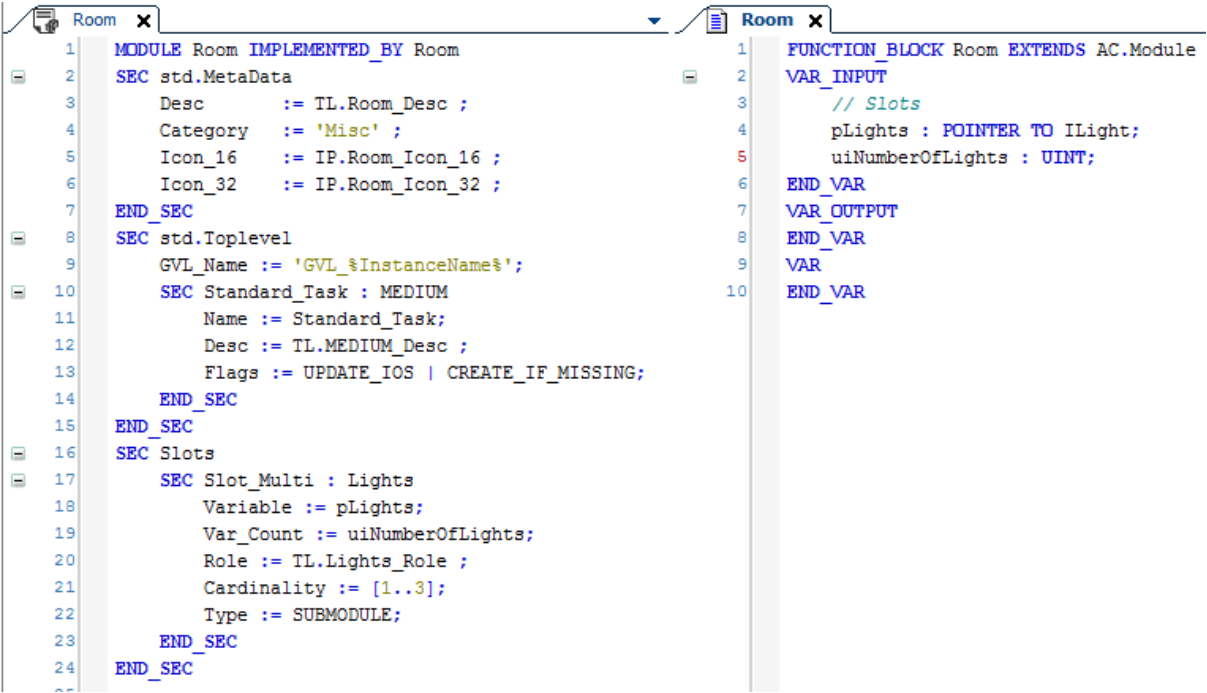
With the
Lightmodule, you also define a slot where a switch can be inserted. Therefore, you need to add aSwitchslot to theLightmodule declaration. Additional parameters of theLightmodule are the speed of the dimmerrSpeedand the maximum brightnessuiMaxValue. Finally, you need to define an output which represents the brightness of the light. You need to add all parameters, slots, and outputs, as well as variables for theLightfunction block.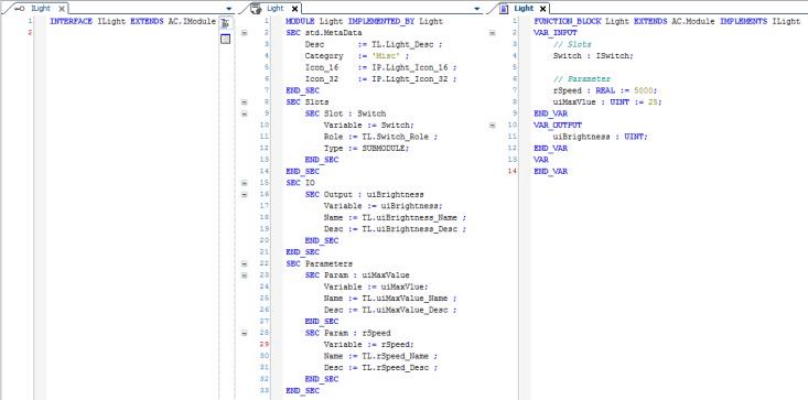
Submodule:
LightSimpleThe last module you create is a simplified light which works with the simple switch. To do this, you need a module declaration and a
LightSimplefunction block which extendsAC.Moduleand implements the existingILightinterface. The differences from theLightmodule are as follows: the output should be of typeBOOLand have the namexSwitchedOn. In addition, therSpeedparameter is not required.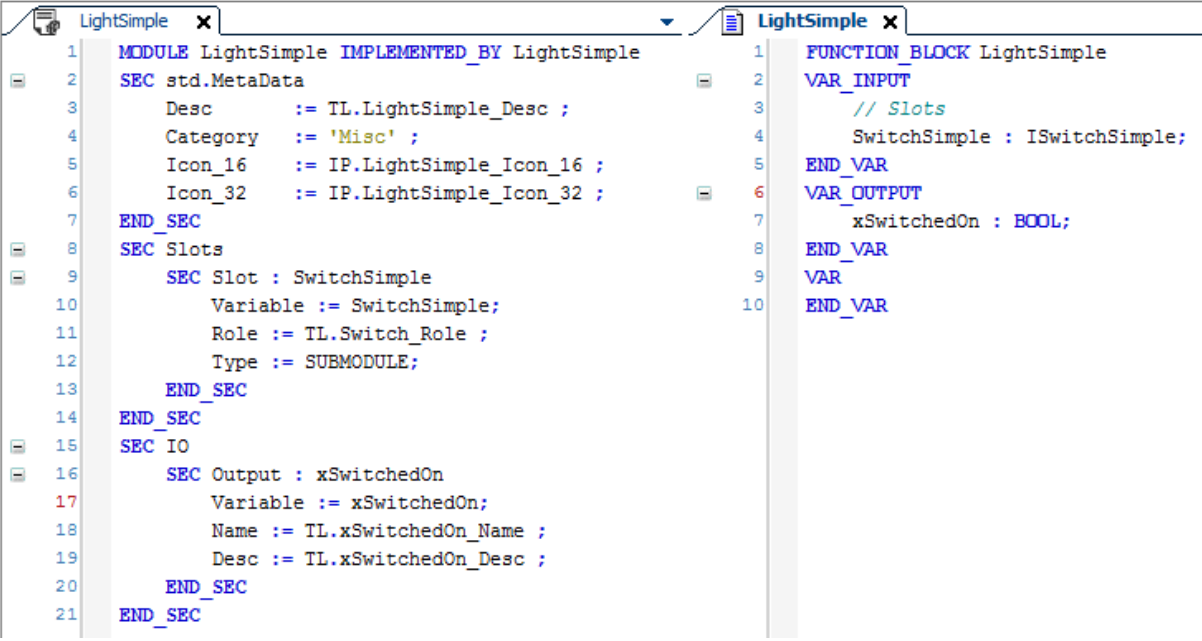
Implementation
For the implementation of the function for the
Switchmodule, use theCallPrioMediumStartmethod fromAC.Moduleand override it with its own implementation. This function is selected because theRoomtop-level module declares aMEDIUMtask. This means that theCallPrioMediumStartmethod of theSwitchfunction block is automatically called in every cycle of the task. However, the main feature of the switch is differentiating between switching on/off and dimming. After pressing the switch, a timer starts with a time which can preset with user parameters. When the timer has elapsed and the switch is still pressed, the dimmer function is applied, which is represented by the variablexPushLong. The variablexPushis TRUE when the switch is pressed only for a short time. For both variablesxPushLongandxPush, properties are added in both theSwitchfunction block and the interface so that they can be used from the parent light function block.Also the
Lightfunction block overrides theCallPrioMediumStartmethod. Depending on the value of the respective input variables, the light is either dimmed or simply switched on/off. For the dimmer, the speed value of the declared parameterrSpeedis used. After the maximum or minimum dim value has been reached, the dimming is stopped. If the light is in a dimmed state and the switch is pressed, then the light is switched on.You can see a possible implementation in the sample project.
Engineering
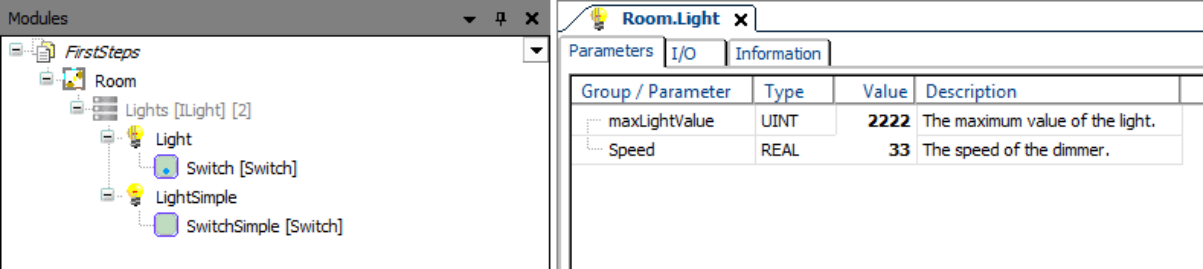
You create the module tree in the Modules view. To do this, first add the
Roomtop-level module to the module tree after the modules have been imported. In theLightsslot, add oneLightand oneLightSimple. To each of these, assign aSwitchor aSwitchSimple. Then you can set the parameters and I/Os of the module instances. For testing purposes, it is advisable to link the inputs and outputs to variables in a global variable list.Finally, use the Composer → Create command to create the project. After downloading to a device, you can test the example however you want. You can also vary the layout of the room without having to modify the code or the modules. You can also modify the values of the module instance parameters and check their effects. The parameter values can be changed both offline and online.
System requirements and restrictions
Programming system | CODESYS Development System (version 3.5.17.0 or higher) |
Runtime system | CODESYS Control Win (version 3.5.17.0) |
Add-on components | CODESYS Application Composer |
Note
 DOWNLOAD Projects