Getting Started
In this chapter, you will learn how to commission a device with CODESYS Control SL runtime, start a small CODESYS application, and license the controller.
The executable file Setup_CODESYSControlRTE<32|64>V3.<version>setup.exe in the installation package is mentioned in the following "setup". The setup installs all available drivers that are included in the package. The setup determines the type of platform to be installed on and modifies the configuration file CODESYSControl.cfg automatically (after you confirm).
Tip
By default, the working directory of CODESYS Control RTE SL is C:\ProgramData\CODESYS\CODESYSControlRTEV3.
Requirements: You know the number of CPU cores in the system where you want to install the CODESYS Control RTE SL. You have performed the preparations described above on your system. (The exact designation of your CPU is shown in the "System" dialog of the Windows control panel. With that information, you can use the Internet to research the number of physical CPU cores.)
Please also note the information about hardware configuration: Hardware Configuration – Recommendations
Load the installation package to your computer. CODESYS Control RTE SL is available in the CODESYS Store International as a single-license version.
Start the installation by executing the file
CODESYS Control RTE <32|64> <version>.exe. Follow the wizard with the default settings until the MultiCore CPU Usage dialog is displayed.Result:

The installation wizard tries to detect the total number of physical processor cores in Cores Total. Check this information and correct it if necessary. In Cores RTE, define how many processor cores should be reserved exclusively for the CODESYS Control RTE SL tasks. As a result, these cores are no longer available for Windows ("AMP" mode).
Note: The number which was already specified (example:
6) is merely a suggestion of the setup. Normally the setup can correctly detect the number of physical CPU cores of your system. A CPU core that is displayed by Windows can also be a "logical" CPU core that is not appropriate for operating the real-time system on it ("hyperthreading core"). Also follow the instruction: Hyperthreading MUST be disabled by BIOS settings!. CPU features such as hyperthreading negatively influence the real-time behavior.You will have to confirm later in a dialog that the setup should reserve a CPU core for the RTE by changing the boot configuration of the system. When doing this, the boot option
numprocis set to <number of physical processors minus1>. Click Next to confirm the specified number of cores.You then see the Boot Options will Change dialog with information about the noted changes to the boot configuration of the PC.
Click Next to continue to the Set Boot Options? dialog.
Result:
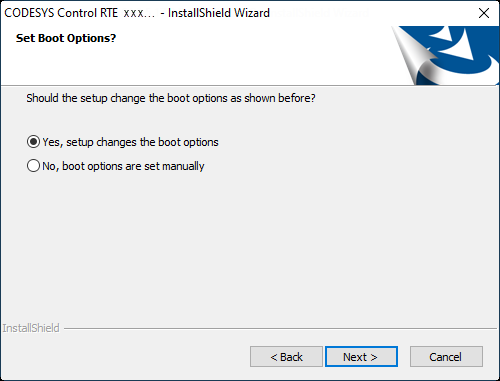
In the Set Boot Options dialog, you decide whether or not the setup should apply the following changes to the start configuration of the system:
Limit of the number of CPU cores that are available to Windows; by means of the boot option "
numproc" to<number of physical cores> - 1.Deactivation of the processor functionality "Data Execution Prevention".
Deactivation of the processor functionality "Physical Address Extension (PAE)".
Tip
The processor functionalities "Data Execution Prevention" and "PAE" do not have to be deactivated necessarily. By editing the start configuration manually, you can limit only the number of cores for Windows. However, this kind of configuration is not tested by CODESYS.
The boot option
numprocis absolutely necessary for the functioning of the RTE in this configuration. Therefore, if you decide here that the setup should not set this option, then you need to activate the option manually.If the setup should apply the changes just described, then click Yes.
If you want perform these changes manually at a later time, then click No.
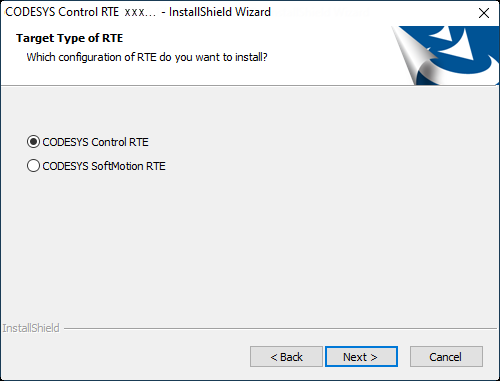
Click Next to continue to the Target Type of RTE dialog.
Result:
Tip
With version CODESYS 3.5 SP17, a distinction between the device types "Control" and "SoftMotion" is no longer necessary. The device type "Control" also includes the full functionality that was reserved previously for SoftMotion devices. The distinction now only exists for compatibility reasons. For new projects, we recommend using "Control".
In the Target Type of RTE dialog, select the RTE type to be installed: CODESYS Control RTE or CODESYS SoftMotion RTE.
The type of installation depends on your application and license. Select "SoftMotion" only if you have purchased and want to use a CODESYS SoftMotion RTE license. If not, then the RTE will start in time-limited demo mode. In the next Select Features dialog, you can still change the selection of the actual functionalities to install: CODESYS SoftMotion RTE and CodeMeter ® for Windows.
Tip
You can switch manually between both CODESYS Control RTE SL types at a later time by editing the configuration file
CODESYSControl.cfg. Do this by entering the following lines in the configuration fileCODESYSControl.cfg:[SysTarget]TargetType=0x1006DeviceName=CODESYS SoftmotionRTE V3By deleting these entries (or prepending with a semicolon), you get a CODESYS Control RTE SL again.
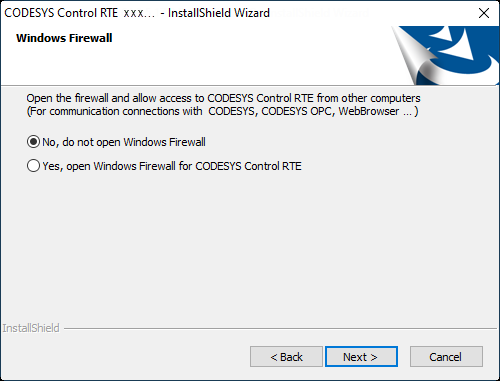
In the Select Features dialog, select the functionalities you want to install.

Open the firewall if you want to access the CODESYS Control RTE SL from other computers. This is necessary, for example, for communication with CODESYS, CODESYS OPC, and when working with Ethernet-based fieldbuses.
Result:
In one of the execution steps, you are prompted whether the time accuracy of CODESYS Control RTE SL should be increased by creating and activating a hardware profile. If you affirm this, then the power option "High Performance" (Control Panel -> Power Options) is selected and the CPU rate is set to 100%.
After the installation is ended successfully, the
 symbol is displayed in the status bar of the screen. You can open the CODESYS Control RTE SL menu by right-clicking it.
The configuration file
CODESYSControl.cfgis adapted automatically.Check whether or not the current device description for CODESYS Control RTE SL installed in your CODESYS Development System. This installation is needed for using CODESYS Control RTE SL with CODESYS. (The development system is not necessarily located on the target system where the RTE is running.)
If you need to reinstall the device description, for example because a subsequent change was necessary, then open the CODESYS device repository and execute the Install command. The description files for adapting the RTE (
.devdesc.xml) are generated by the setup in the installation directoryOthers.It is imperative that you execute the restart that is required at the end of the installation.
For more information, see: Installing Devices
Adapting the configuration of CODESYS Control RTE SL
Requirement: You have performed the installation as described above. You have installed CODESYS.
Use your device with the configuration available after the installation: Continue with the instructions below "Starting CODESYS Control RTE SL".
Adapt the configuration of the locally installed CODESYS Control RTE SL: Click the CODESYS Control RTE SL symbol
in the system tray of your PC. Click PLC Configuration in the CODESYS Control RTE SL menu to open the configuration editor. Edit the settings however you like.Use the CODESYS Control RTE SL that is installed on a remote PC. Click the CODESYS Control RTE SL symbol
in the system tray of your PC. In the CODESYS Control RTE SL menu, click Remote PLC. In the open dialog, configure the connection settings of the remote PLC.
The configuration is saved in the configuration file CODESYSControl.cfg in the directory C:\ProgramData\CODESYS\CODESYSControlRTEV3.
After successful installation, CODESYS Control Win SL runs as a service on your computer. You get an installation in the following ways:
You have installed the CODESYS Development System. As a result, a CODESYS Control Win SL version with limited duration is installed on your PC.
You have downloaded CODESYS Control Win SL from the CODESYS Store and run the setup file to install it.