Processing Device Projects and Library Projects in One Workspace
This guide shows a model of how development is done on a device project and a library project together in one workspace. Changes made in the library project are directly available in the device project.
Requirements:
CODESYS 4 is open.
Creating a workspace and a library project
Click the Menu → Create Workspace command.
Alternatively, you could select the command by using the
 button or the Command Center.
The Select a Path for the Workspace File dialog will open.
In this dialog, give a name to the new workspace – for example
Calculator– and click the button to select the desired path in the file system. Then click OK.
The Add Project to Workspace dialog will open.
In this dialog, select the Create Library Project command.
In the Create a new Library Project dialog, specify the data of your new library project.
Click the
button to select the location.Specify the project name, for example
CalculatorLibrary.Specify values for all other required parameters.
The version number must be a 3 or 4-part semver, for example
2.1.0or1.0.0.0.
Click the Create button.
The library project will be created.
The library project will be displayed in the workspace navigator as follows:
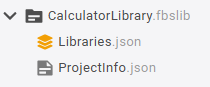
Creating library POUs in the library project
In the workspace navigator, right-click the
CalculatorLibrary.fbslibitem and select the Add Item → Function command.In the Add Function dialog, specify a name for the function – for example
Addition– andINTas the Return value.Select Structured Text (ST) as the Implementation language and click Create.
The
Addition.fn.stfunction will be added to the workspace navigator and opened in the editor.In the editor, add the variable declarations for the input variables
x : INT;andy := INT;as well as the implementation codeAddition := x+y;so that the final function looks like this:// Small function to perform addition // x + y FUNCTION Addition : INT VAR_INPUT x : INT; y : INT; END_VAR VAR END_VAR Addition := x+y; END_FUNCTIONIn the workspace navigator, add another function named
Subtractionwith the Return valueINTto the library project. Select Structured Text (ST) as the Implementation language and click Create.In the editor, also add the variable declarations and implementation code to the
Subtractionfunction so the final function looks like this:// Small function to perform a subtraction // x - y FUNCTION Subtraction : INT VAR_INPUT x : INT; y : INT; END_VAR VAR END_VAR Subtraction := x - y; END_FUNCTION
Creating a device project that uses the library
Requirement: The workspace with the library project created in the guide above is open.
Select the Menu → Create Device Project command, or click the
 icon and select the command.
In the next dialog, specify the data for your new project and then click Create.
Click the
button to select the location. Choose the same location as for the library project.Choose the project name, for example
CalculatorDevice.Specify values for all other required parameters.
The version number must be a 3 or 4-part semver, for example
2.1.0or1.0.0.0.
In the Add PLC dialog, select the controller – for example CODESYS Control Win V3 x64 – and click OK.
In the next dialog Add Program,
PLC_PRGis already given as the Name and Structured Text (ST) is selected as the Implementation language. Click Create to confirm the dialog.The device project will be created and added to the workspace navigator parallel to the already created library project:
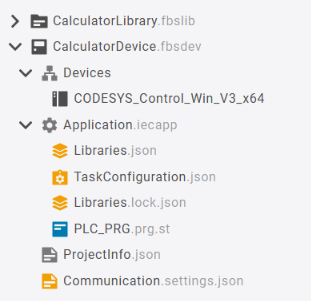
The
PLC_PRG.prg.stprogram will be opened in the editor.In the workspace navigator, double-click the
Libraries.jsonfile of the device project and reference theCalcLiblibrary project.{ "references": { "Standard": { "$type": "Placeholder", "placeholder": "Standard" }, "CalcLib": { "$type": "RelativePath", "path": "../../CalculatorLibrary.fbslib" } }, "placeholderOverrides": {}}Right-click the
Libraries.jsonfile and select the Resolve Libraries command in the context menu.The libraries will be resolved.
The
Libraries.lock.jsonitem will be updated with the library references.
Switch to the editor of the
PLC_PRG.prg.stprogram and add a variable declaration and the implementation code. When you type the first few letters of the name of your library name, the autocomplete function will suggest the library. The completed program will look like this:PROGRAM PLC_PRG VAR iVar : INT := 0; END_VAR iVar := CalcLib.Addition(iVar, 2); iVar := CalcLib.Subtraction(iVar, 1); END_PROGRAMRight-click the
Application.iecappitem and select the Build Application command.CODESYS 4 compiles the project. If no errors have occurred, then you can proceed with Setting up communication with the controller and logging in to the controller.
Make any desired changes to the library directly in the library project.
When logging in again, CODESYS 4 detects the change and opens the Confirm Download dialog. It is not necessary to resolve the libraries again.
Setting up communication with the controller and logging in to the controller
Double-click the
Communication.settings.jsonitem.The Communication Settings wizard will open in the editor.
Click the Configure Device button.
The Device Browser dialog will open.
Click the Add Gateway button.
Important
The controller must be running in order to set up the gateway.
In the Add Gateway dialog, choose a name for your gateway and click Add.
Note: The values for IP address and Port remain unchanged.
The gateway will be displayed in the device browser.
The available controllers will be displayed.
Click your controller to select it and click the Connect Device button.
Because a user management has not been set up on your device yet, the Create Initial User for Device dialog will open.
Choose a user name and password. Confirm the password and click Apply.
Note: The chosen password must be at least 8 characters long and contain at least one uppercase letter, one lowercase letter, one special character, and one digit.
In the Log In to Device dialog, provide your new credentials and click Log In.
The notification Connection successful will be displayed.
In the Device Browser dialog, click Select.
For more information, see the following:
Communication.settings.jsonRight-click the Application.iecapp application and select the Download Application command.
In the Confirm Download dialog, click the Download button.
Click the
 icon (top right) or press the Alt+F8 shortcut to log in to the controller.
The notification Login succeeded will be displayed.
Click the
 icon (top right) to run the program.
Open the
PLC_PRGprogram in the editor.The inline monitoring in the editor will show the changing value of the
iVarvariable.Click the
 icon (top right) to stop the program.
Click the
 icon (top right) or press the Ctrl+F8 shortcut to log out of the controller.